
A little early but with my work schedule migrating towards nights and I leave on vacation the 23rd I don't foresee much more in the way of painting so here goes:
The end of the year total is:
Painted:
190 Miniatures
7 Vehicles
10 Objective Markers
16 Ressurection Protocol Markers
Made but not painted (intentionally)
1 Vehicle [CENSORED BY THE INQUISITION]
40 Objective markers (30 Ultramarine markers given for free, five Necron markers given as a gift and 5 [CENSORED BY THE INQUISITION])
All told, down from last year but I lost two months to travel and even more to work. I expect next year to be down a little as well. I am going to shift focus to more terrain; I have boxes of parts and ideas that have been gathering dust literally for years. My big miniature project/yearly challenge will be Heresy Era Ultramarines and I look forward to getting started on them, however my current era Ultras still have plenty of work needing to be done on them.
Until then, Merry Christmas and Happy New Year to all of you!
Sunday, December 18, 2011
Wednesday, December 14, 2011
In Your Honor, Honor Guard Conversions and More Chapterhouse Goodness
First, thank you GW for converting Marnie Calgar and his buddies to finecast. No I actually mean that; other than some minor work I have not had any problems with this set:
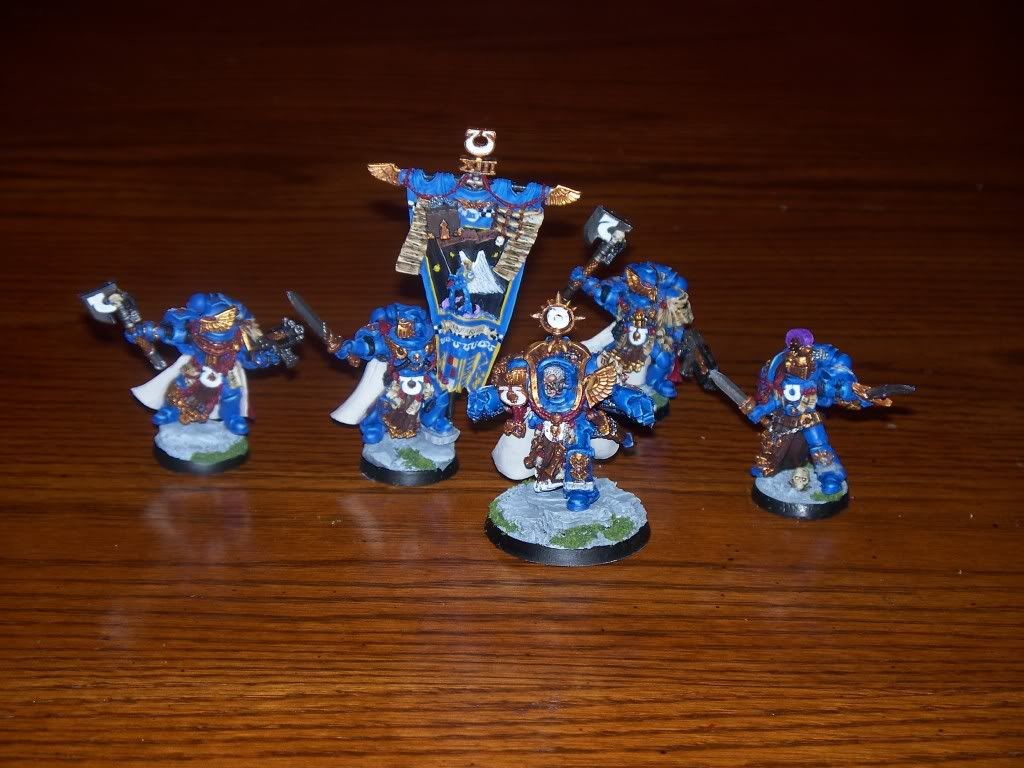
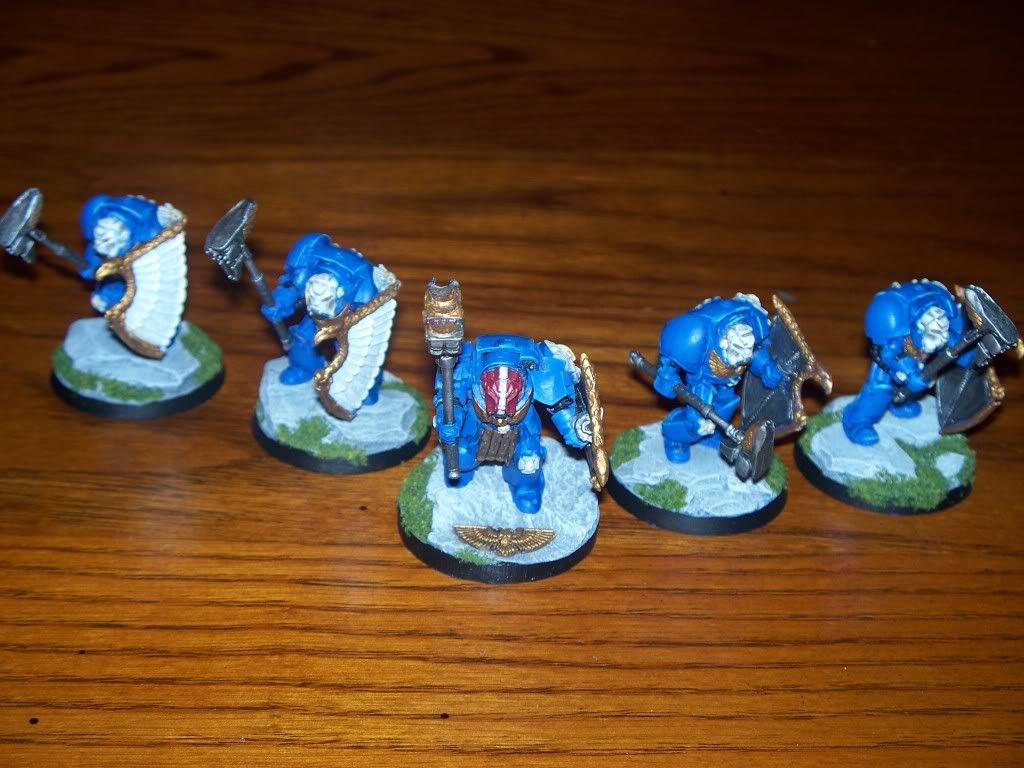
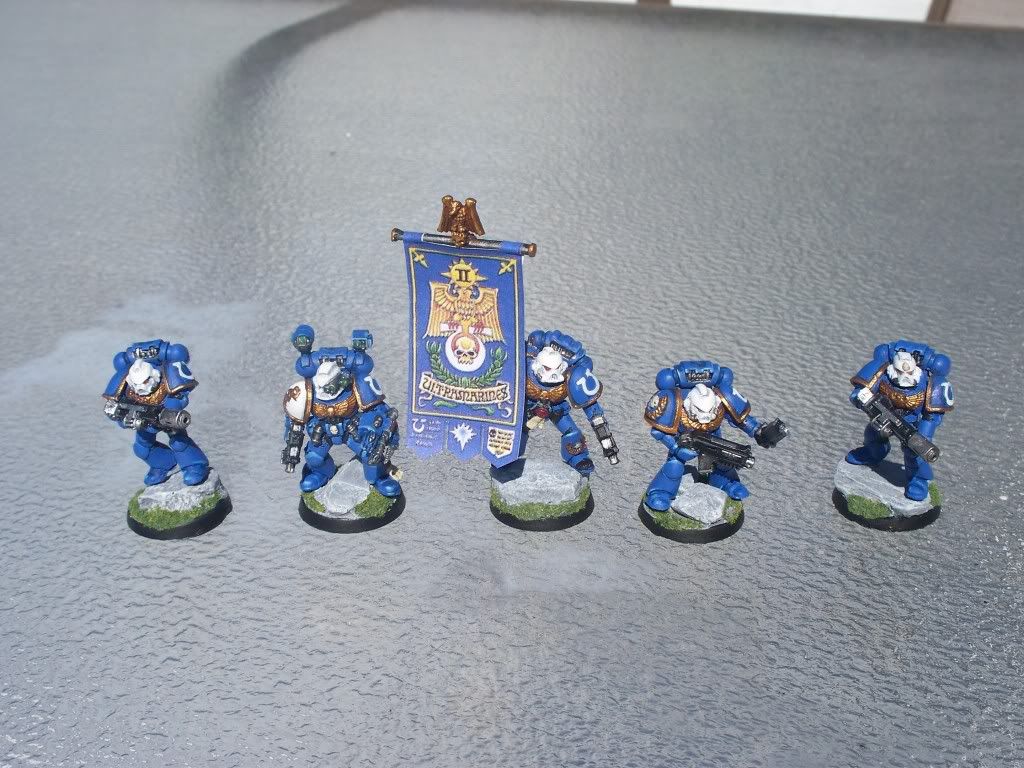
On the other hand, thanks (sarcasm this time) for not making the individual Honor Guard available for purchase any more. So I was forced by my overwhelming cravings for a second honor guard squad to make my own using Tac Marines as a base and the Spartan Heads from Chapterhouse Studios:
There was a bit of conversion work obviously. The swords were cut from some spare terminator arms (those arms are were converted to hold the Thunder Hammers on the termies I did earlier). I used various extra bits from the tac squad and command squad for the shoulders as well as the GW metal Ultramarines shoulder pads. I made leather straps for the front and sculpted capes (thanks to Ron over at fromthewarp.blogspot.com for the tutorials, as well as modelbits.co.uk for some spare parts not in my bits box).
The real thing that made these a cut above (as far as anything I've done could be considered a cut above anything else) was the heads. To make them fit properly I pinned them on to the torsos (the base of the head is a touch small to fit perfectly) but that was not a problem. The heads themselves were fantastic and there were no issues with flash (they are metal so bubbles were not a problem). I have a ton more and plan on using them in my Heresy era projects.

On the other hand, thanks (sarcasm this time) for not making the individual Honor Guard available for purchase any more. So I was forced by my overwhelming cravings for a second honor guard squad to make my own using Tac Marines as a base and the Spartan Heads from Chapterhouse Studios:

There was a bit of conversion work obviously. The swords were cut from some spare terminator arms (those arms are were converted to hold the Thunder Hammers on the termies I did earlier). I used various extra bits from the tac squad and command squad for the shoulders as well as the GW metal Ultramarines shoulder pads. I made leather straps for the front and sculpted capes (thanks to Ron over at fromthewarp.blogspot.com for the tutorials, as well as modelbits.co.uk for some spare parts not in my bits box).

The real thing that made these a cut above (as far as anything I've done could be considered a cut above anything else) was the heads. To make them fit properly I pinned them on to the torsos (the base of the head is a touch small to fit perfectly) but that was not a problem. The heads themselves were fantastic and there were no issues with flash (they are metal so bubbles were not a problem). I have a ton more and plan on using them in my Heresy era projects.
Saturday, December 10, 2011

Friday, December 2, 2011
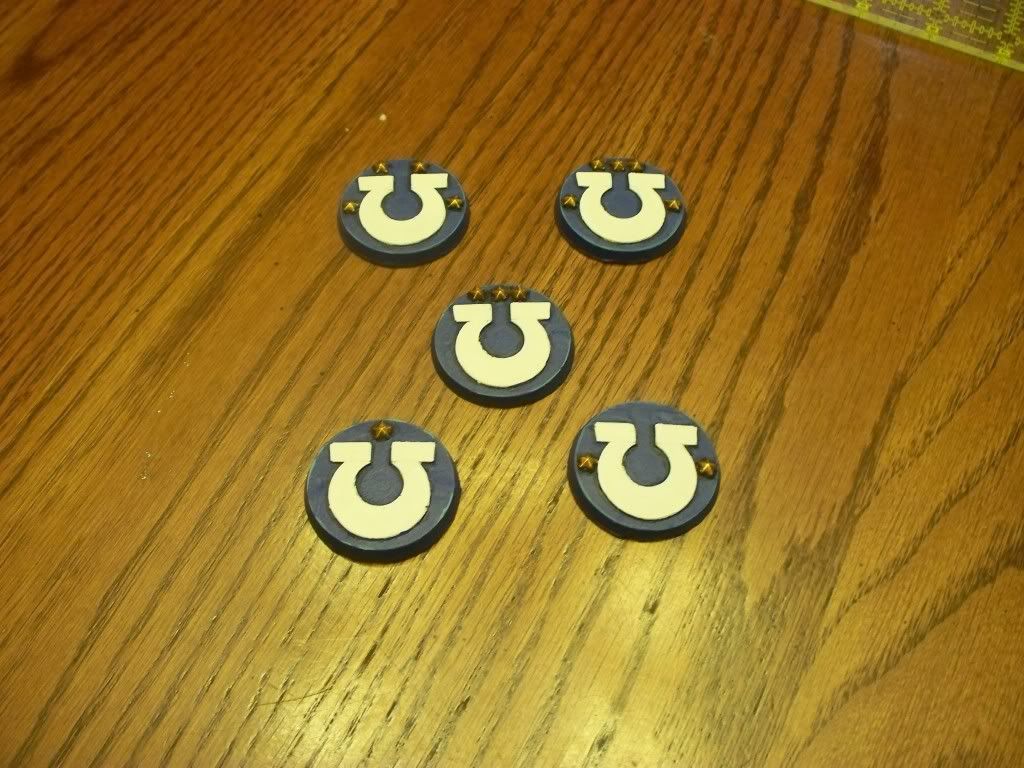
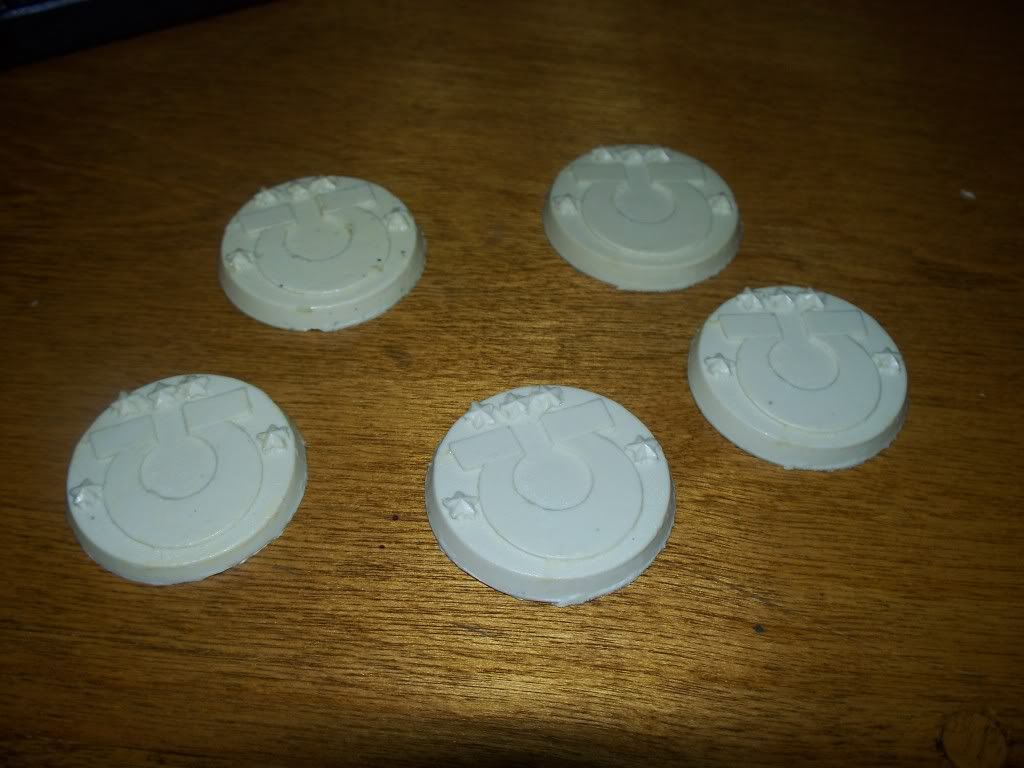
Markers A-Go-Go
Here are my Ultramarines objective markers which close out this year's Freeboota Challenge:
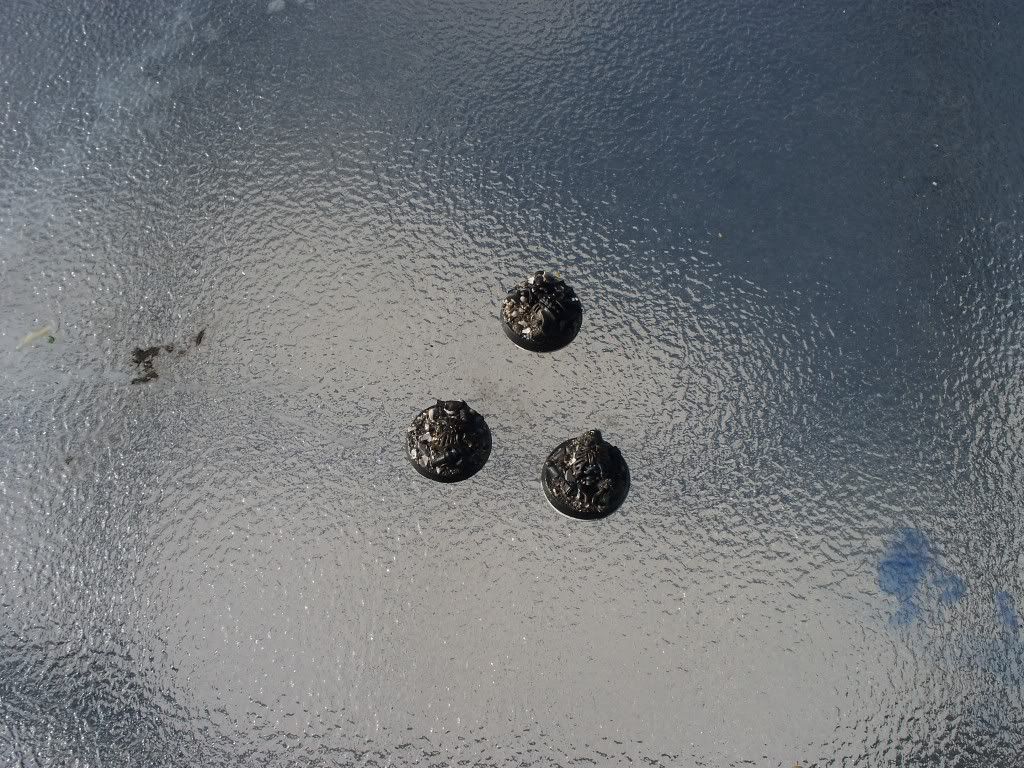
And here are the failures from the polyester project. They were primed black and I painted them up. The picture is blurry but essentially they worked out fine.

And here are the failures from the polyester project. They were primed black and I painted them up. The picture is blurry but essentially they worked out fine.

Saturday, November 26, 2011

Thursday, November 24, 2011
Working with Polyester Resin and the Sweet Smell of Failure and Success
By polyester I am not referring to this:

I'm referring to polyester resin:
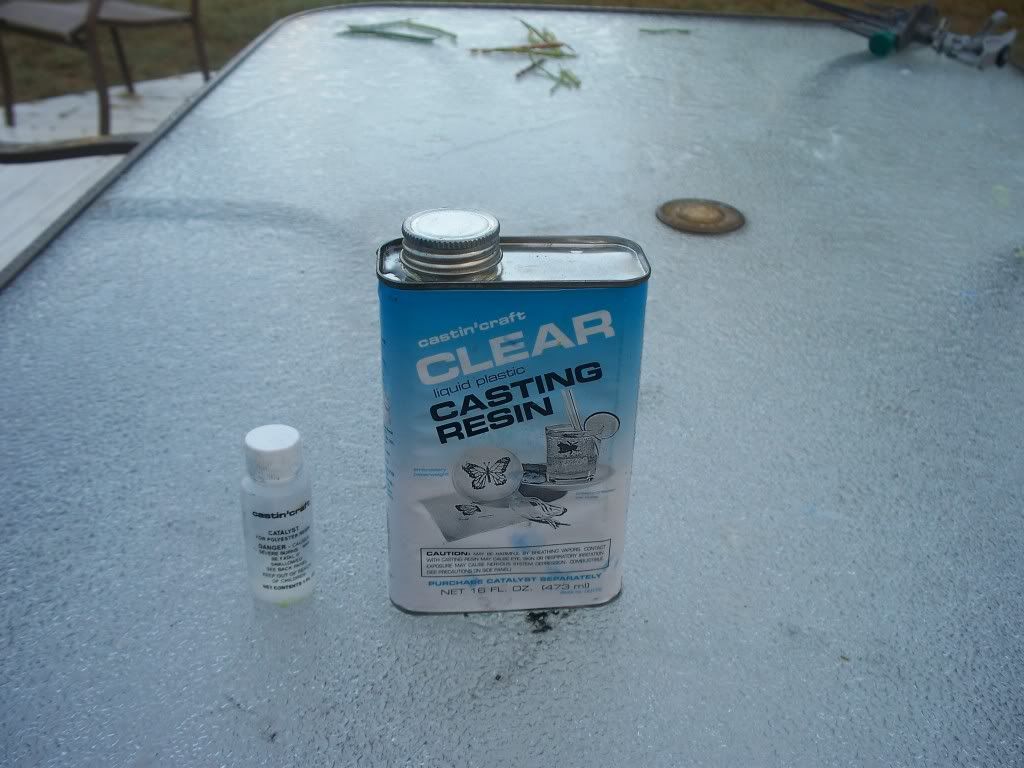
What is Polyester Resin?
Polyester resin is different from the kind of resin we usually use in that it is clear and rather than being comprised of two parts you mix in equal amounts (Alumilite brand resins for example), you have the resin and a hardening agent. Other things to consider (and this lead to a load of headache for me) is that it is much slower to harden than the two-stage resins. In fact, there is no set resin time. In my research the universal answer was that it depended on temperature, humidity, amount used, thickness, and the amount of dye added. There are ways to accelerate the process but we will get to that in a minute. The other thing is that far more than two-stage resins, this stuff puts of fumes. Massive fumes. Massive as in I was working with it outside on a 15-20 mile an hour wind day and still getting a headache from working with this stuff. You can add dyes to color the resin. More on this below. Similiarities; you will use all the same tools as the two-stage resis and for the love of everything holy, use gloves.
Why Use Polyester Resins?
If you want to make something clear such as a water effect, crystals, or Reanimation Protocol markers which is the source of this endeavor. A disclaimer, I do not endorse or in any way support the copying of licensed miniatures. However, if you have created your own original miniature or detailed item and wish to copy it, polyester resin is not the right medium. Why? Other than the difficulty stated before, it just does not flow in my humble opinion, as well as two-stage resins and loses some of the detail when you remove it from the mold if it is not completely hardened. Again, for the project I used it for, it sufficed.
What I Did and Lessons Learned
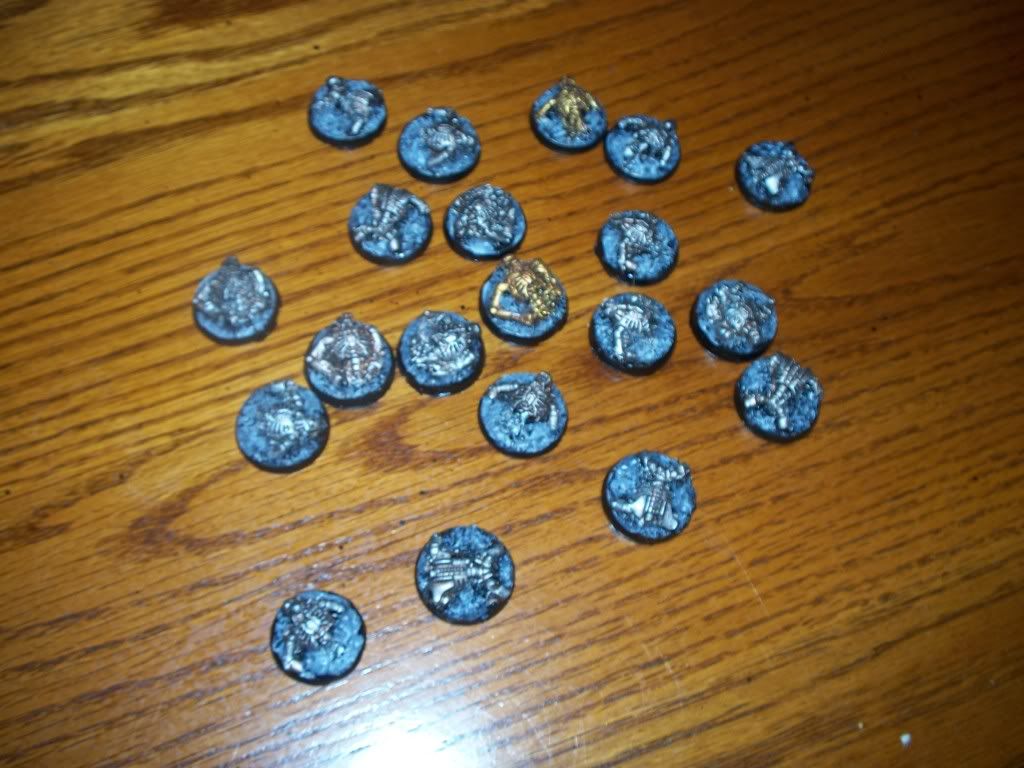
For my Deepstriking Santa gift for the 40K Radio Freebootaz, I wanted to give my recipient (identity to remain secret) some Ressurection Protocol markers.
Step 1: Create Markers
Pretty easy-I sacrifices some extra warriors for the cause and built up markers on 25mm bases:
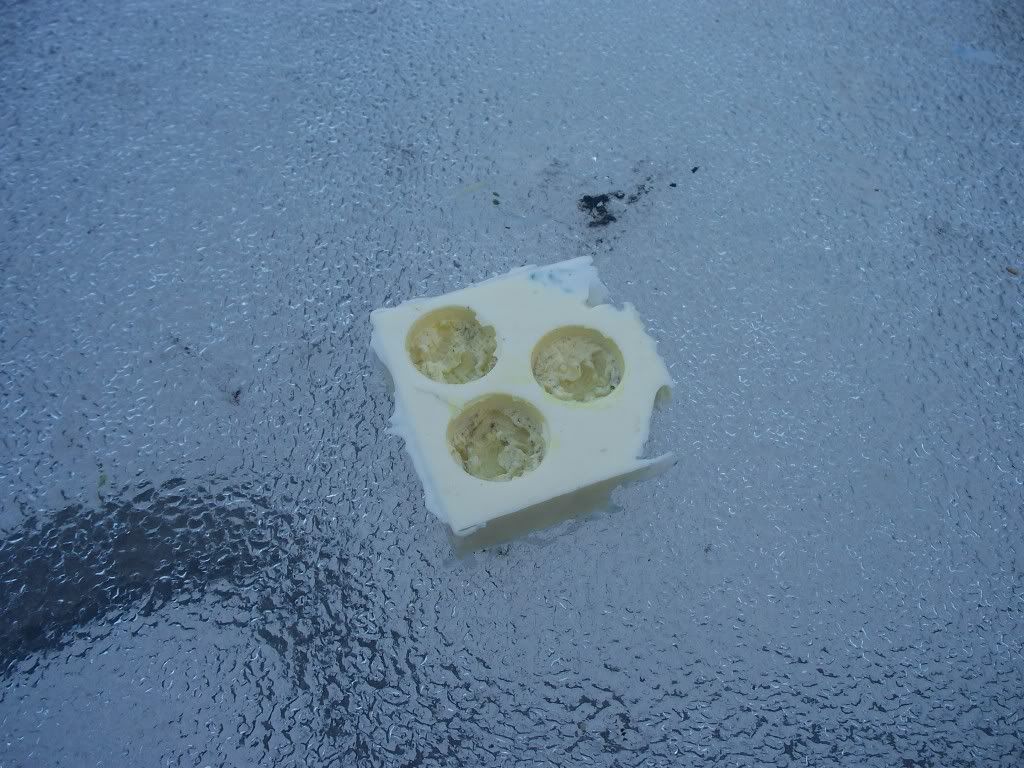
Step 2: Create Mould
Using Alumilite mold-maker, I made a mold. So far nothing new.
Step 3: Fail
Pour the resin:
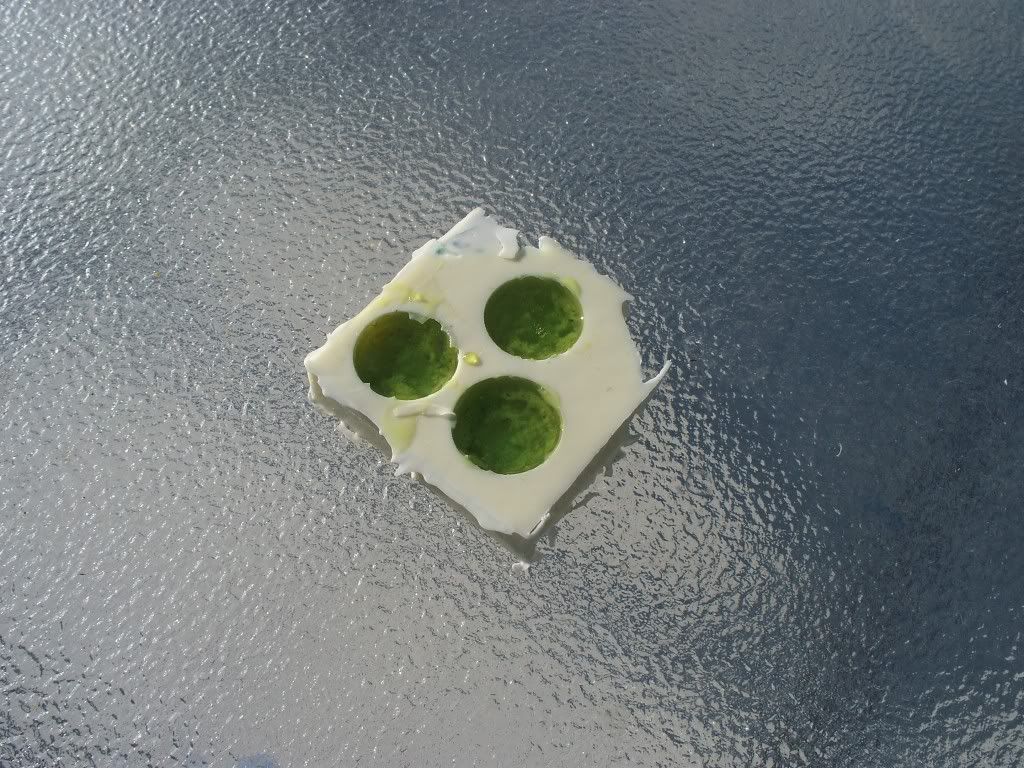
Mix the resin and the dyes in a container until you have the right color you are looking for. Then pour an amount equal to what you need for a single batch into a smaller container and add the catalyst. Fill the molds. I strongly recommend having additional molds available for any extra resin that you don't use in the mold. In this case I had some crystal molds that suited this purpose well. Make sure you keep the completed molds in a warm dry place. When exposed to humidity they started to fog on the surface but once put in drier air the fog went away.
Test batch 1-3:
Sure they look fine (and with some primer they will do the job nicely) but I wanted neon green markers. So what went wrong?
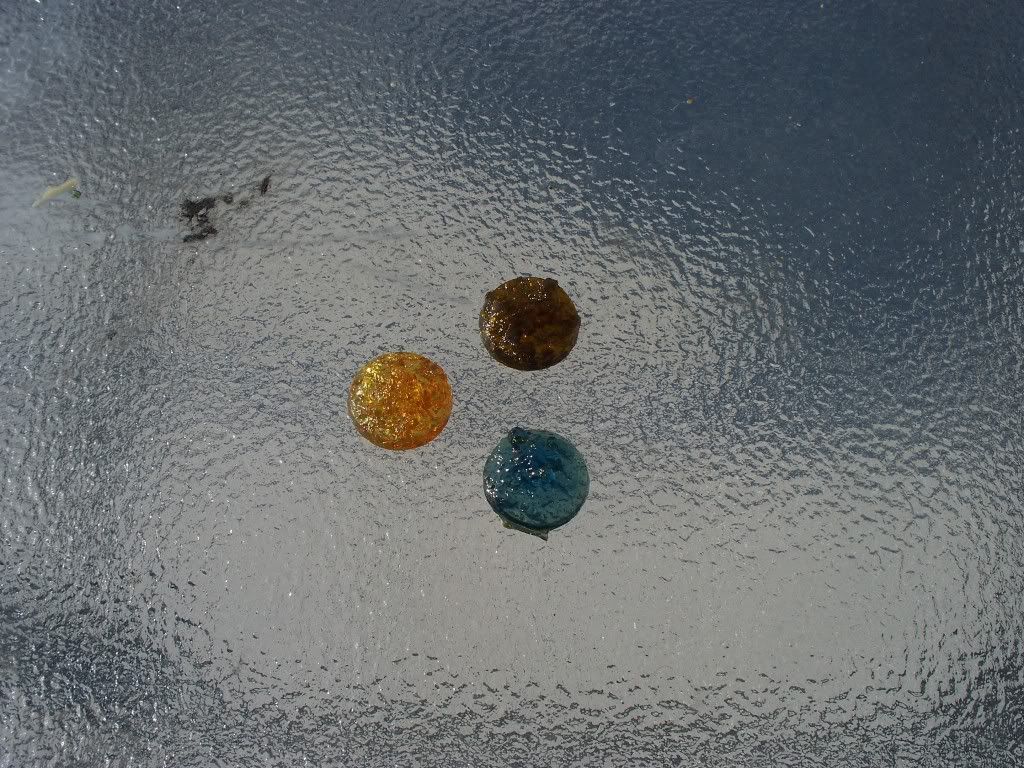
Dyes
I pointed out you can by dyes to put in the resin. The dyes look like food coloring only the medium is something compatible with resin rather than water. Herein lies the problem. Simply put, the yellow sucks. It is that same orange color that food coloring is made of and when I mixed in the blue (which worked fine) it created a nasty brown-green rather than the bright green I wanted. After some experimentation I learned that you can use yellow ink or even green paint (although if you use the paint it will be more translucent than clear) to dye. This will add to drying time of course.
Hardening Time and How to Jack it Up
Which brings us to failure number two. I told you that you add drops of catalyst to harden the resin (technically you are accellerating the hardining process-it is hardening at a glacial pace the moment it is made). Again, this is not quite the straight up process as it is with the two-stage resins. Here you add not only by mass but by thickness of what you are molding. So I added differing amounts on different batches and the results were usually about the same; a sticky mess the consistency of thick gelatin after about an hour. This is where a little detail is going to be lost as some resin is left in the mold. Now yes I could have left it in their for eight to ten hours each but I am also on a timeline to get this stuff done in so it can reach my recipient something close to Christmas. Frankly between an hour and three hours there was no real difference. Remember the gloves reference? That's because this stuff comes out sticky. Really, really sticky.
So what do you do with sticky markers since that makes a sub-optimal gift? I tried accelerating the process by putting them in the oven. Big mistake. First, I used 300 degrees F and it took forty-five minutes to finally harden. Second attempt I tried to speed it up and used 350. Remember the fumes I mentioned? In both cases the entire house wound up smelling like a chemical factory. This in turn brought retribution from the spouse and this process was abandoned. In addition, the 350 degrees caused the markers to harden too fast and crack (also a side effect of using too much catalyst) and worse, they went from a passible green to a nasty brown as the dyes were burnt.
Step 4: Reattack and Use Patience
Success!
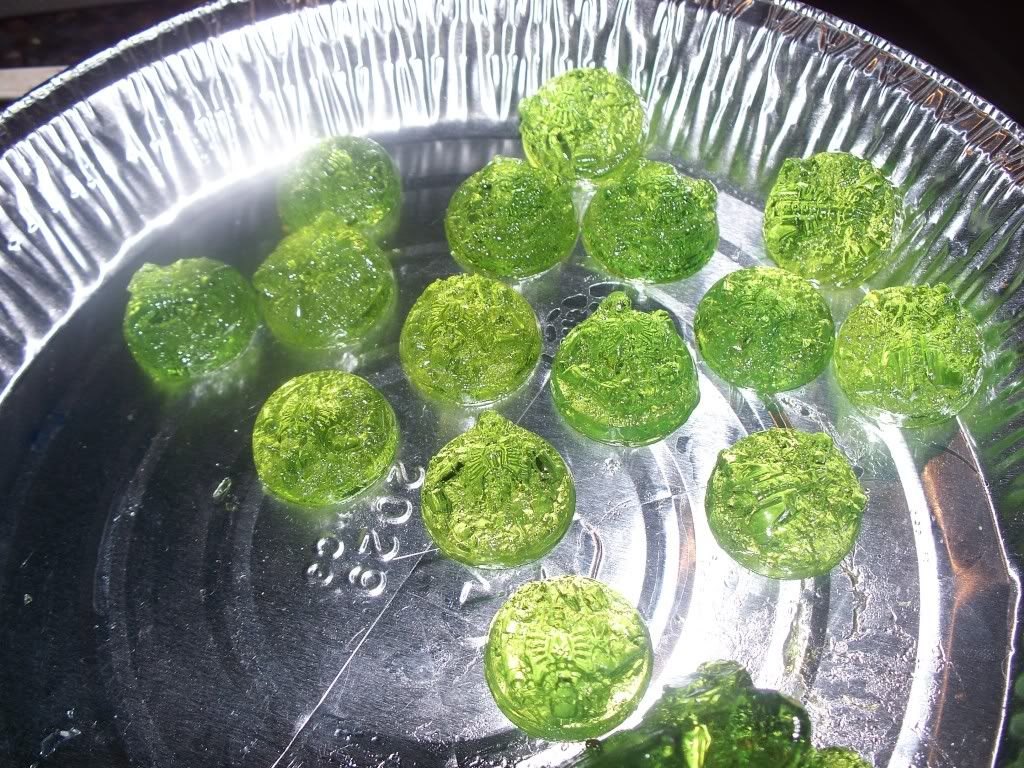
What did I do differently? Once I de-moulded the markers I put them in the pie plate and let them sit for a day in a warm dry place. In time the catalyst and molecular nature did their jobs without my interference and the result is what you see below. On the down side, I have used so much resin that I only have enough for a couple more batches. I plan on using the failure by priming them and painting them for myself; primer seems to stick to the resin just fine and with a nice coat of paint, no one will know my shame.

I'm referring to polyester resin:

What is Polyester Resin?
Polyester resin is different from the kind of resin we usually use in that it is clear and rather than being comprised of two parts you mix in equal amounts (Alumilite brand resins for example), you have the resin and a hardening agent. Other things to consider (and this lead to a load of headache for me) is that it is much slower to harden than the two-stage resins. In fact, there is no set resin time. In my research the universal answer was that it depended on temperature, humidity, amount used, thickness, and the amount of dye added. There are ways to accelerate the process but we will get to that in a minute. The other thing is that far more than two-stage resins, this stuff puts of fumes. Massive fumes. Massive as in I was working with it outside on a 15-20 mile an hour wind day and still getting a headache from working with this stuff. You can add dyes to color the resin. More on this below. Similiarities; you will use all the same tools as the two-stage resis and for the love of everything holy, use gloves.
Why Use Polyester Resins?
If you want to make something clear such as a water effect, crystals, or Reanimation Protocol markers which is the source of this endeavor. A disclaimer, I do not endorse or in any way support the copying of licensed miniatures. However, if you have created your own original miniature or detailed item and wish to copy it, polyester resin is not the right medium. Why? Other than the difficulty stated before, it just does not flow in my humble opinion, as well as two-stage resins and loses some of the detail when you remove it from the mold if it is not completely hardened. Again, for the project I used it for, it sufficed.
What I Did and Lessons Learned
For my Deepstriking Santa gift for the 40K Radio Freebootaz, I wanted to give my recipient (identity to remain secret) some Ressurection Protocol markers.
Step 1: Create Markers
Pretty easy-I sacrifices some extra warriors for the cause and built up markers on 25mm bases:

Step 2: Create Mould
Using Alumilite mold-maker, I made a mold. So far nothing new.

Step 3: Fail
Pour the resin:

Mix the resin and the dyes in a container until you have the right color you are looking for. Then pour an amount equal to what you need for a single batch into a smaller container and add the catalyst. Fill the molds. I strongly recommend having additional molds available for any extra resin that you don't use in the mold. In this case I had some crystal molds that suited this purpose well. Make sure you keep the completed molds in a warm dry place. When exposed to humidity they started to fog on the surface but once put in drier air the fog went away.
Test batch 1-3:

Sure they look fine (and with some primer they will do the job nicely) but I wanted neon green markers. So what went wrong?
Dyes
I pointed out you can by dyes to put in the resin. The dyes look like food coloring only the medium is something compatible with resin rather than water. Herein lies the problem. Simply put, the yellow sucks. It is that same orange color that food coloring is made of and when I mixed in the blue (which worked fine) it created a nasty brown-green rather than the bright green I wanted. After some experimentation I learned that you can use yellow ink or even green paint (although if you use the paint it will be more translucent than clear) to dye. This will add to drying time of course.
Hardening Time and How to Jack it Up
Which brings us to failure number two. I told you that you add drops of catalyst to harden the resin (technically you are accellerating the hardining process-it is hardening at a glacial pace the moment it is made). Again, this is not quite the straight up process as it is with the two-stage resins. Here you add not only by mass but by thickness of what you are molding. So I added differing amounts on different batches and the results were usually about the same; a sticky mess the consistency of thick gelatin after about an hour. This is where a little detail is going to be lost as some resin is left in the mold. Now yes I could have left it in their for eight to ten hours each but I am also on a timeline to get this stuff done in so it can reach my recipient something close to Christmas. Frankly between an hour and three hours there was no real difference. Remember the gloves reference? That's because this stuff comes out sticky. Really, really sticky.
So what do you do with sticky markers since that makes a sub-optimal gift? I tried accelerating the process by putting them in the oven. Big mistake. First, I used 300 degrees F and it took forty-five minutes to finally harden. Second attempt I tried to speed it up and used 350. Remember the fumes I mentioned? In both cases the entire house wound up smelling like a chemical factory. This in turn brought retribution from the spouse and this process was abandoned. In addition, the 350 degrees caused the markers to harden too fast and crack (also a side effect of using too much catalyst) and worse, they went from a passible green to a nasty brown as the dyes were burnt.
Step 4: Reattack and Use Patience
Success!

What did I do differently? Once I de-moulded the markers I put them in the pie plate and let them sit for a day in a warm dry place. In time the catalyst and molecular nature did their jobs without my interference and the result is what you see below. On the down side, I have used so much resin that I only have enough for a couple more batches. I plan on using the failure by priming them and painting them for myself; primer seems to stick to the resin just fine and with a nice coat of paint, no one will know my shame.
Saturday, November 19, 2011
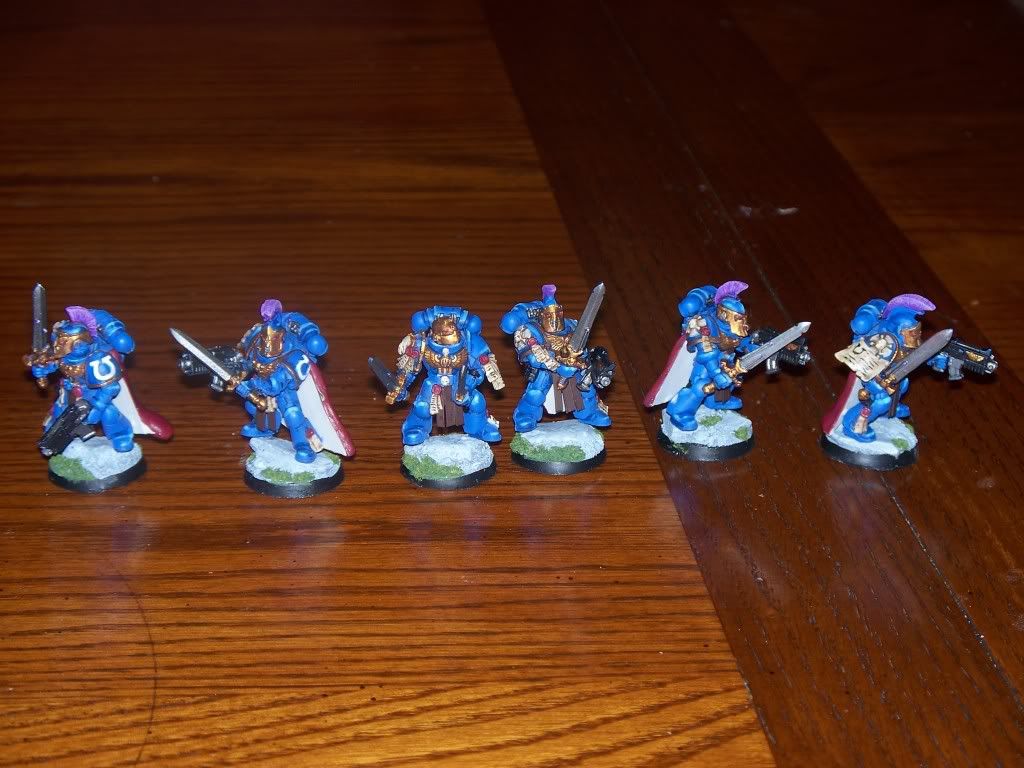
OT: Original Terminators and More Chapterhouse Goodness
Went old school (or rather saved myself at least 150 bucks) and converted over my old terminators to Ultramarines. I used some Chapterhouse Studios hammers and shields to convert what were regular terminators into Thunderhammer/Stormshield Terminators. However, for all my talk of using original terminators, many of the arms came from leftover bits from the new plastics. Because one of my T-hammer terminators is missing, I had to use the AoBR sergeant with a front plate swap (the idea of wearing the best armor the imperium has to offer but no helmet drives me crazy-except for the capitain where I didn't want to jack with the original figure). I also knocked out a Hunter Killer missle to swap out on my Land Raider.
I really like the shields and hammers and I think they work much better than the dinky shields the terminators come with. They have flourish worthy of 1st Company marines.
Lightning Claws (Why? Because I ran out of arms and have a ton of claws).
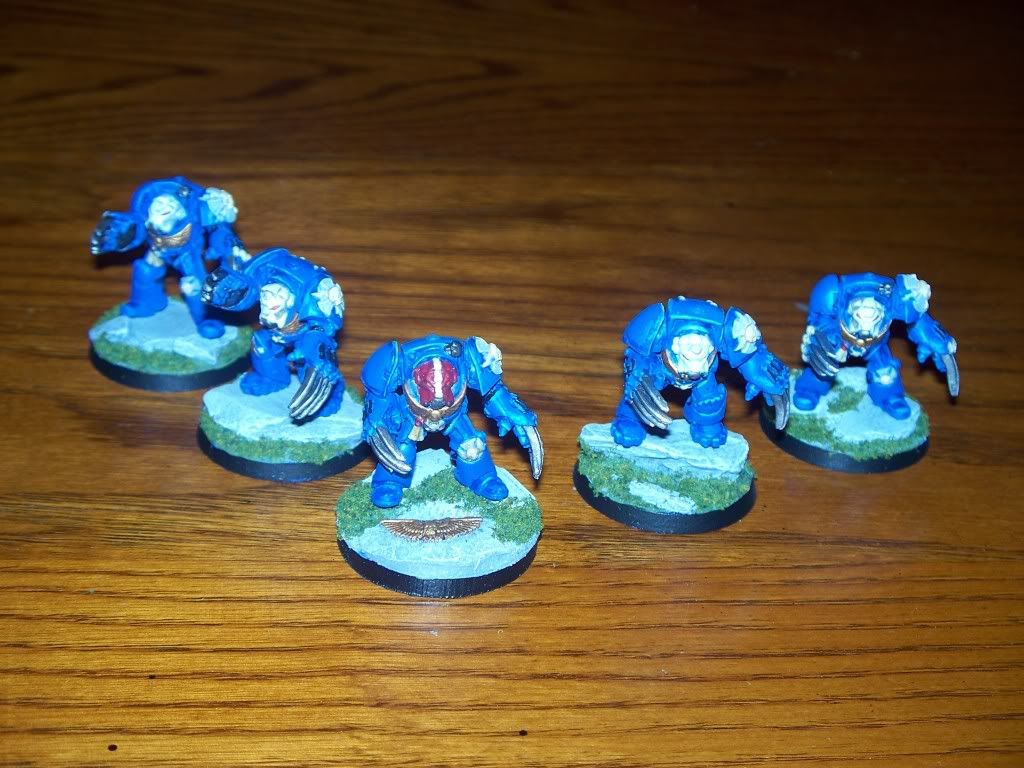
Lastly, Captain, Librarian, and missile:

I really like the shields and hammers and I think they work much better than the dinky shields the terminators come with. They have flourish worthy of 1st Company marines.

Lightning Claws (Why? Because I ran out of arms and have a ton of claws).

Lastly, Captain, Librarian, and missile:

Saturday, November 12, 2011
The Story So Far
Although I think this may be a ploy by my once-again nemesis to spy on what I have available for our upcoming battles(I still have some tricks up my sleeve if that is the case), here is what I have done so far for my Ultramarines project (bear in mind that this has been this year alone):
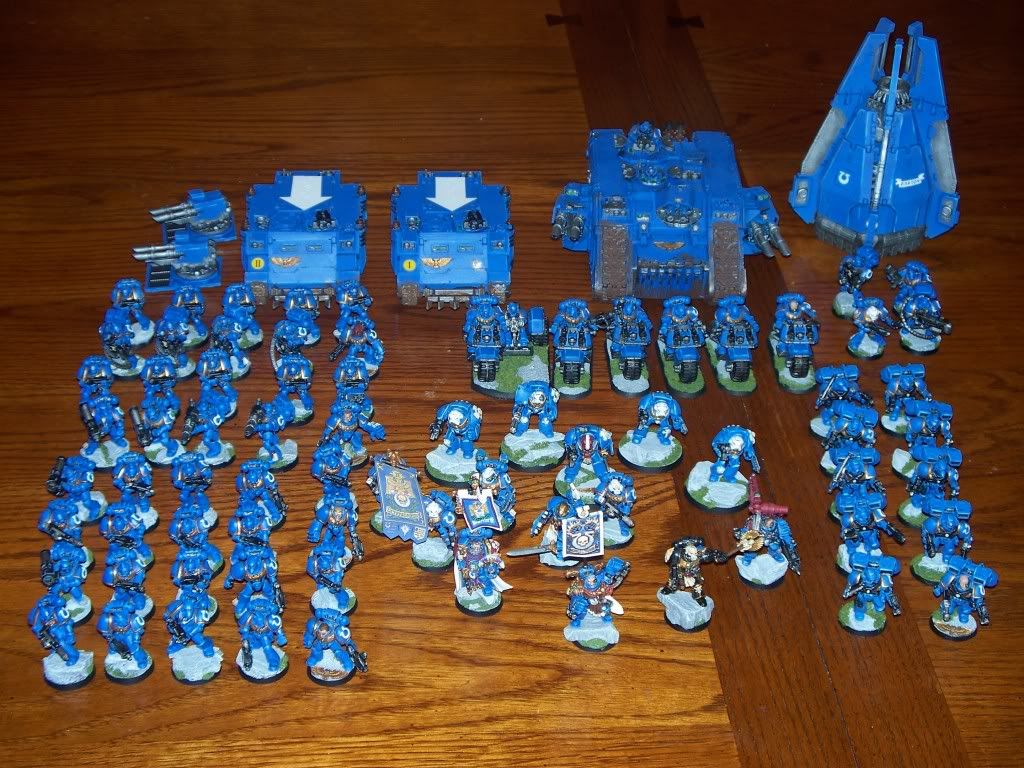
It does mean that I need to plan out carefully my next couple of moves as time is running out...

It does mean that I need to plan out carefully my next couple of moves as time is running out...
Thursday, November 10, 2011
Rhino/Razorbacks
Finishing off my transports for this month are these two Rhino/Razorbacks:
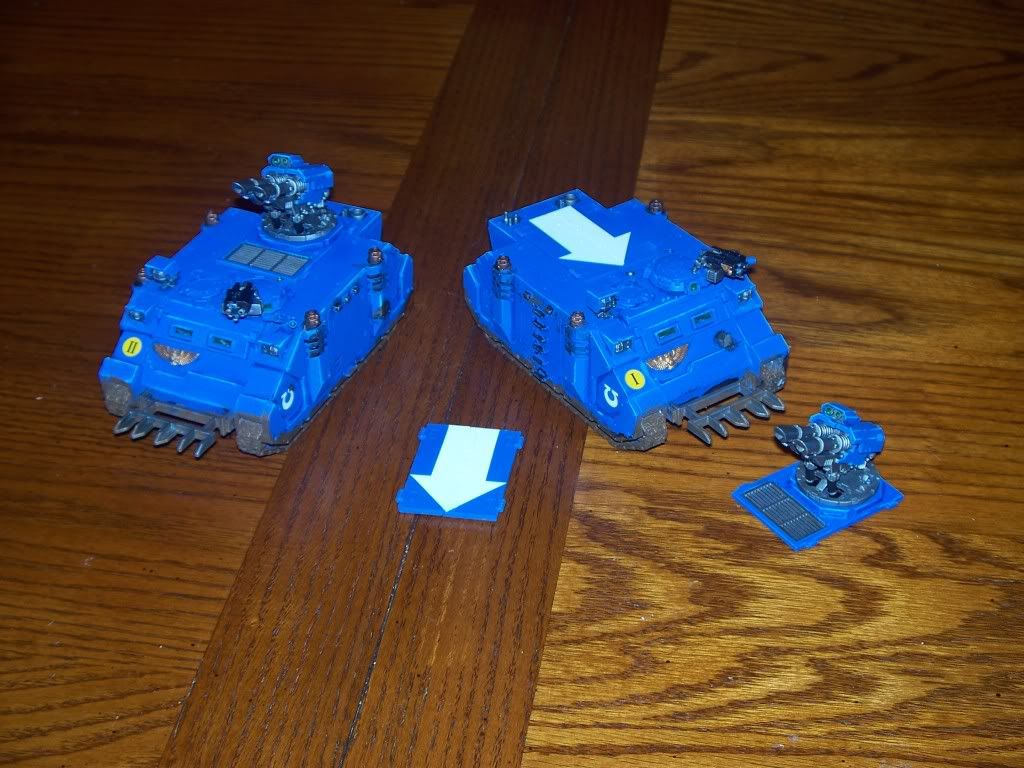
Next up will be some Thunder Hammer Terminators.

Next up will be some Thunder Hammer Terminators.
Saturday, November 5, 2011
This Old Drop Pod
This month's theme overall will be transports but for the Freebootaz November Motivational Challenge (Fast Attack-or dedicated transports for said Fast Attack) I offer This Old Drop Pod:
Bob Vila "Well let's see what Ian is doing over here."
Ian "Hi Bob, well I got this drop pod in a trade and to be frank, she needs some work."
Bob "Tell me."
Ian "Well, for starters the doors won't close and one had a peg break off. Fortuantely or unfortunately depending on your point of view, the original assembler used tons of super glue so she came apart pretty easily. I've fixed the broken door with some brass rod and shaved down more flash than paparazzi convention. The missile launcher had to be removed and remounted but it now spins again. I also stripped off the Black Templar symbols on the side. We'll see what, if anything, I replace them with."
Bob "It looks like you are making great progess. Let's go over to Sam who is working on some models he bought off of Ebay. Hey Sam, I've never seen models painted with house paint before!"
Sam "AAAAAAAAAAAAAAAAAAAHHHHHHHHHHHHHHHHHHHHHHHH!! !!"
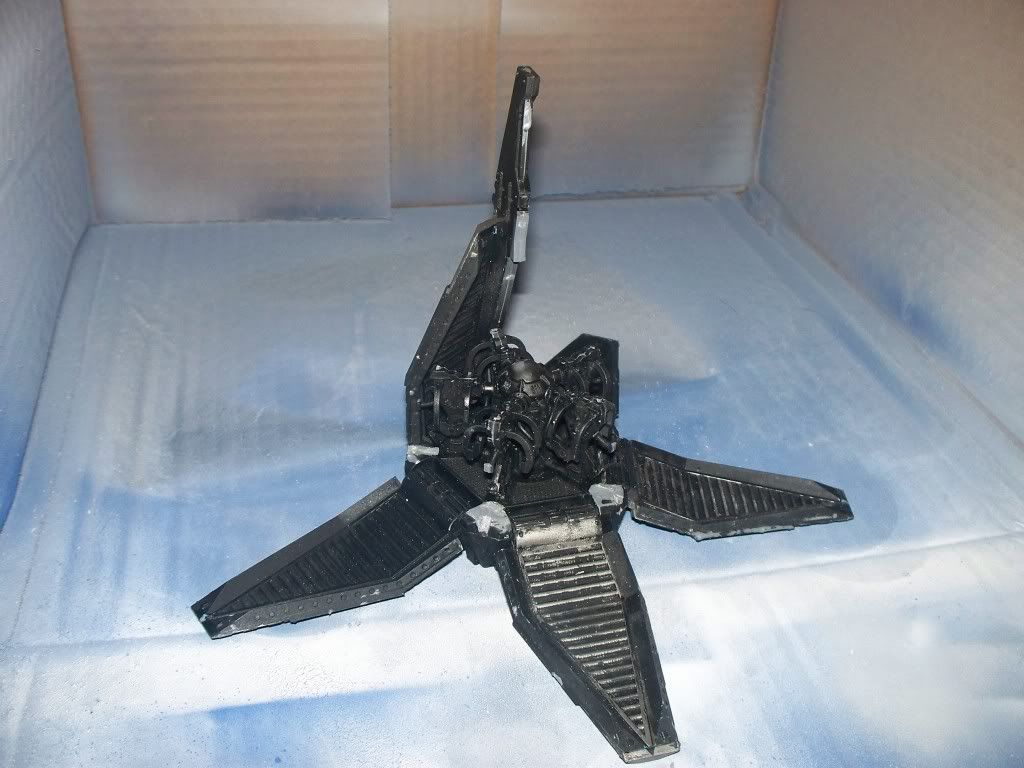
Five Days Later
Bob "Well this really turned out well Ian."
Ian "Yeah, I had to scrape off more paint, add in some plates to cover some removed iconography and consecrate it with sacred sweet meats but overall I'm pleased with the results and you can't recognize it from the original body."
Bob "That's just great Ian. Now lets see how Sam's attempt to strip that house paint off using sulfuric acid went."
Sam "AAAAAAAAAAAAAAAARRRRRRRRRRRRRGGGGGGGGGGGGGHHHH!"

Friday, October 28, 2011
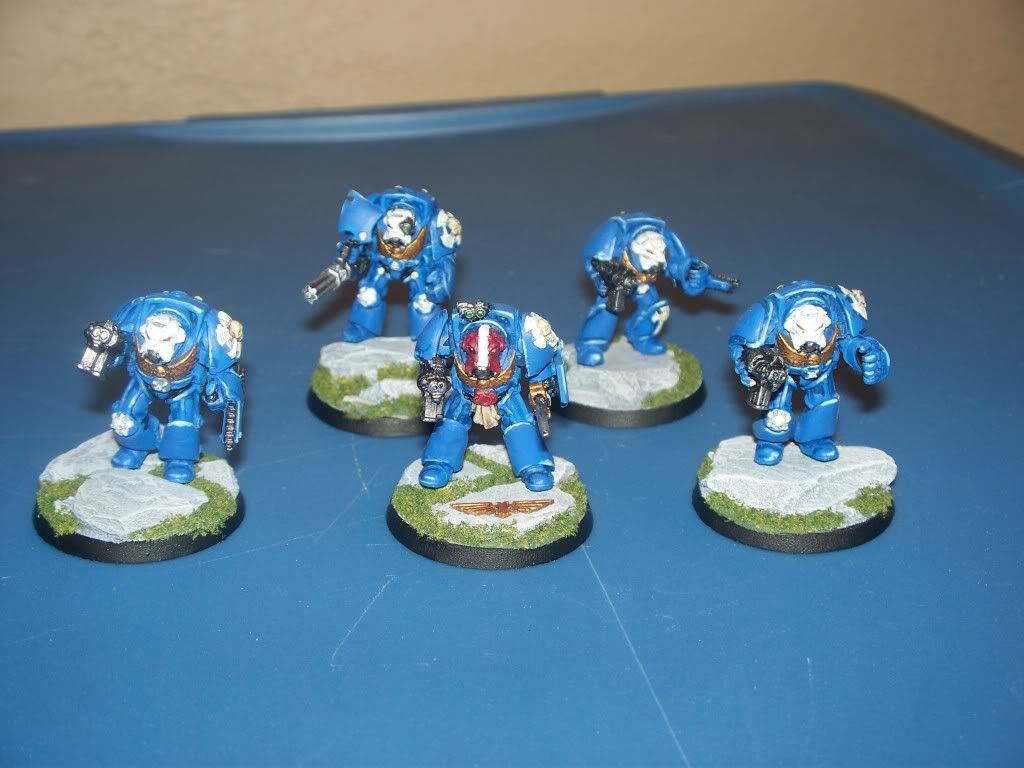
Chapterhouse Product Review and Command Squad
I purchased the Conversion Beamer set from Chapterhouse Studios a while back and mounted it on my Ultramarines Techmarine (which I guess makes him the head guy). Note that I am not going to use this as a forum to rant about their legal issues with GW.
The set came on the sprue pictured below. There was some flash (sarcastic gasp) which anyone who has ever molded their own product will tell you is an inevitable byproduct of the process but their molds went together well and there were no bubbles.
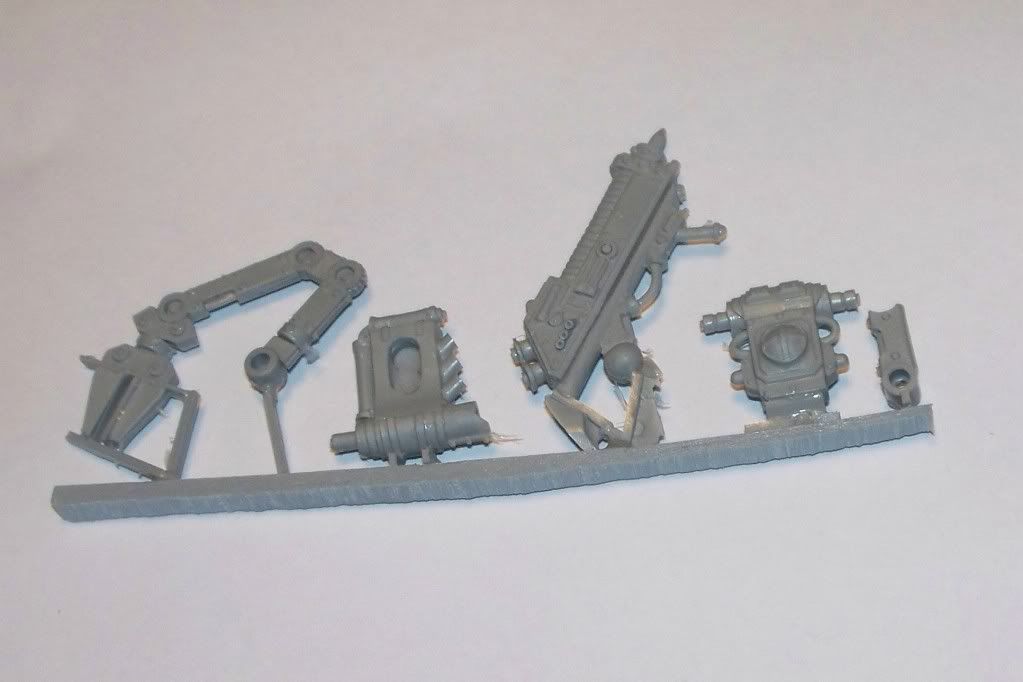
My only complaint is that on their website, at the time I assembled this model and at the time I am making this post, there is no picture of how it should go together. When you understand that what you see is your choice of two different backpacks, assembly is then fairly obvious but it took some head-scratching to finally figure it out and a picture is worth a thousand words as they say.
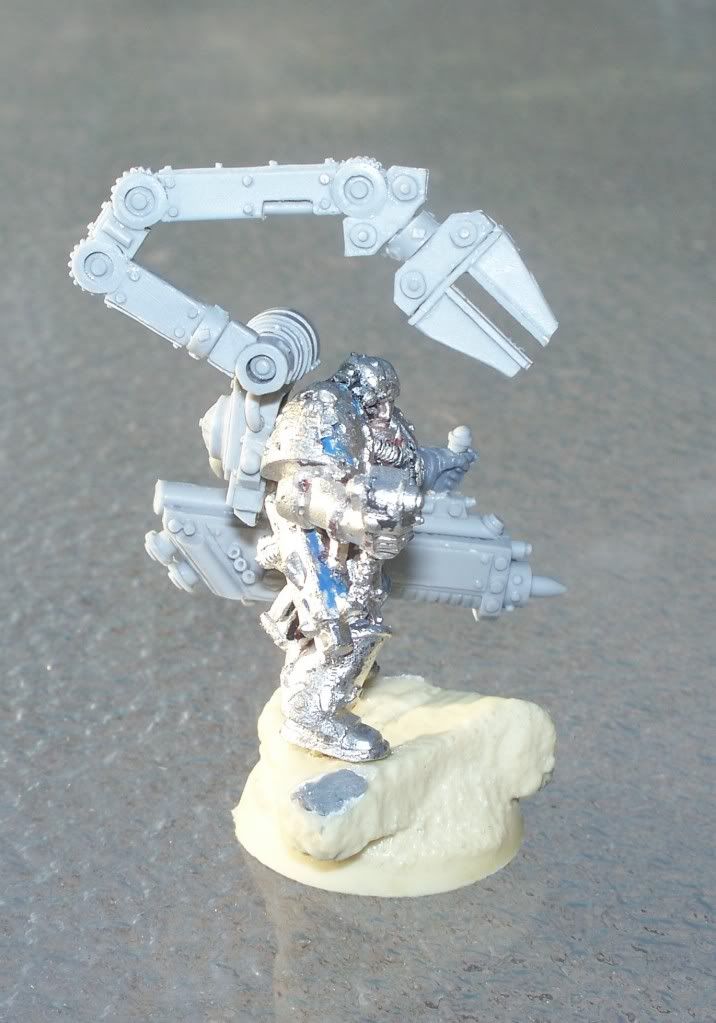
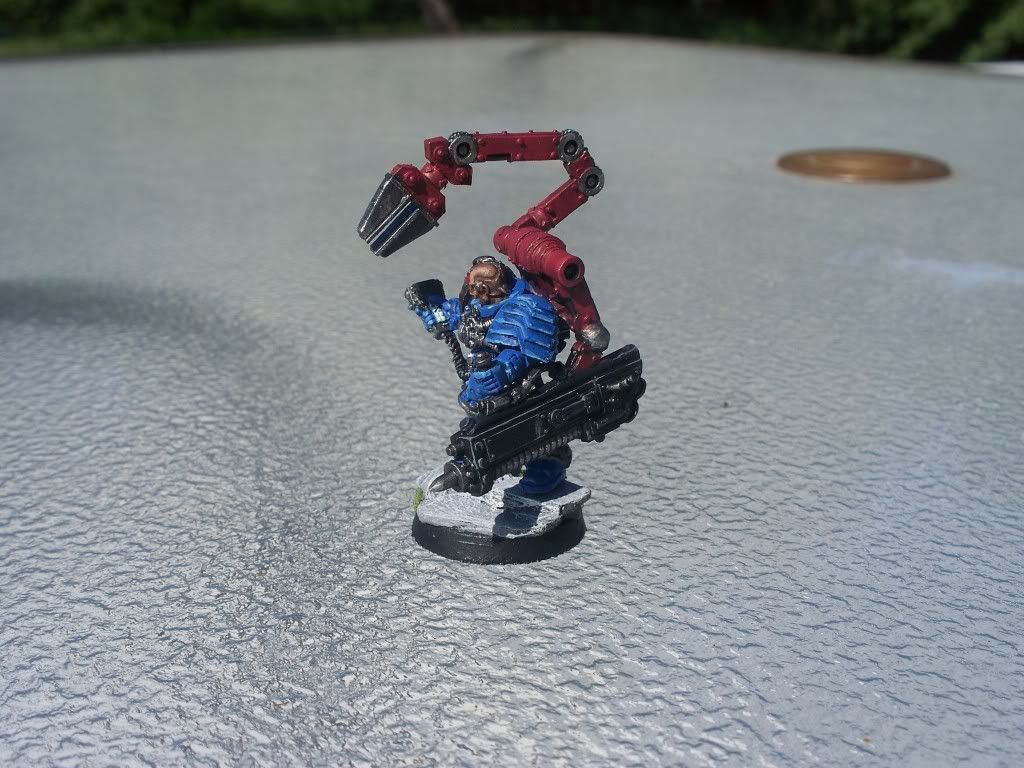
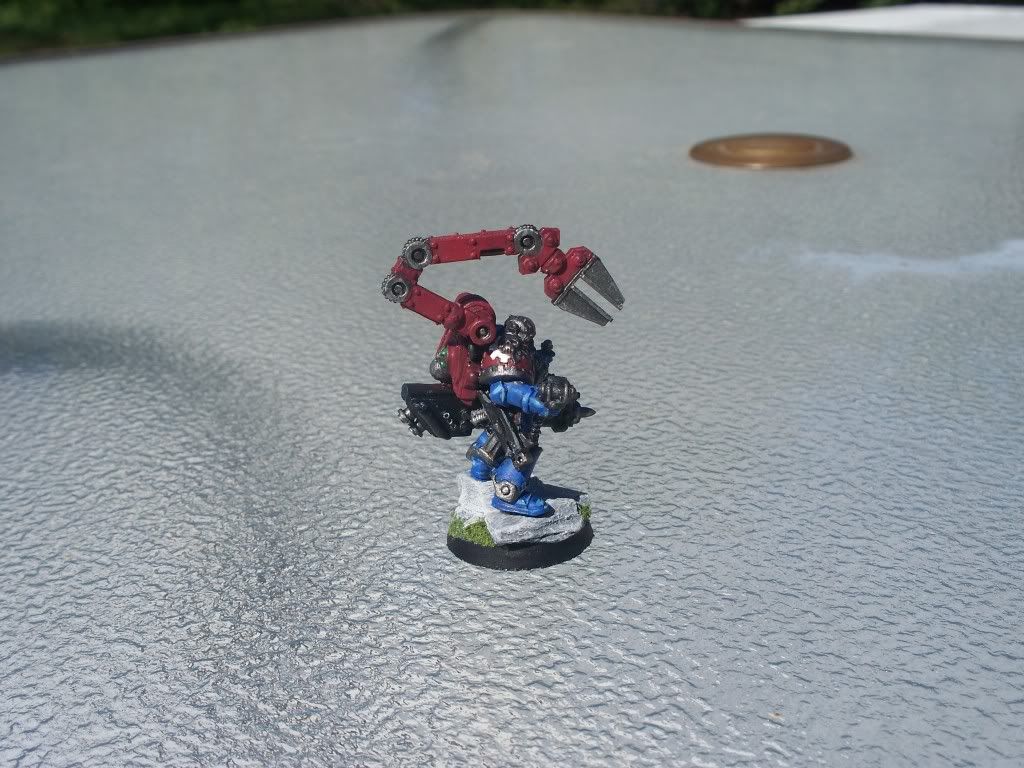
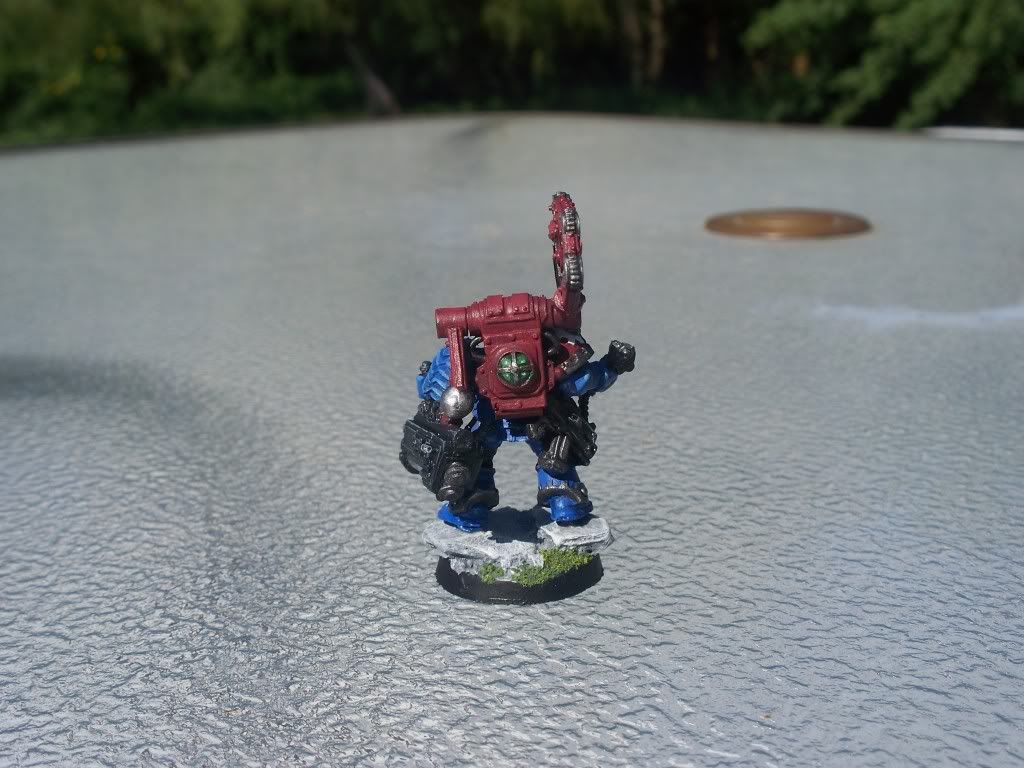
Here is my assembled product mounted on a recycled techmarine, you will not I used one of their shoulder pads as well:
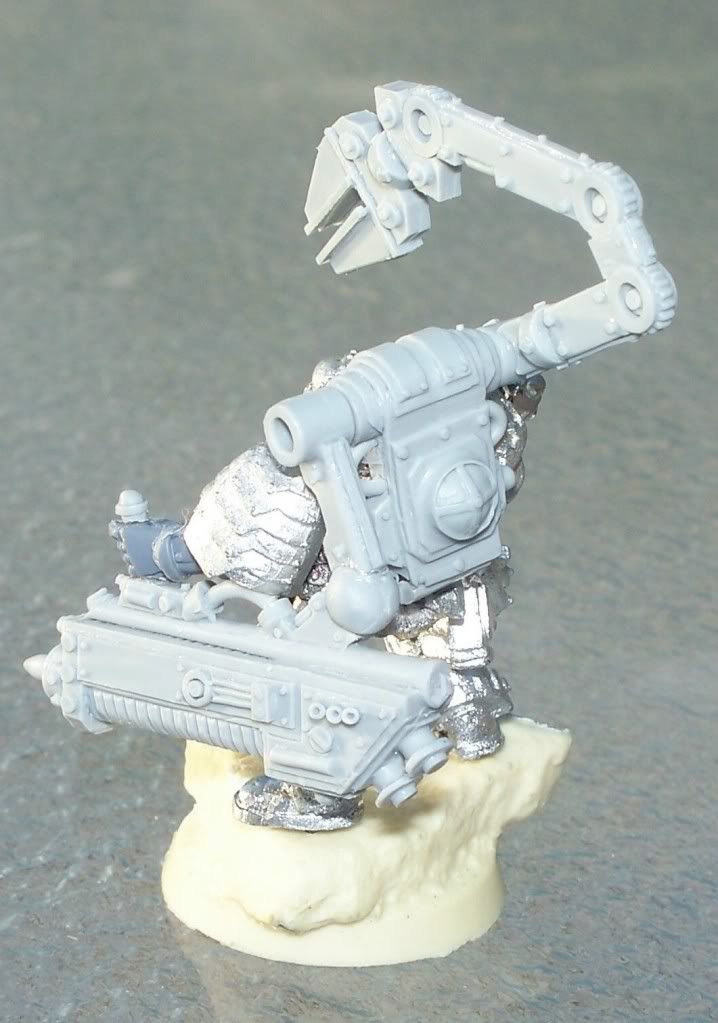
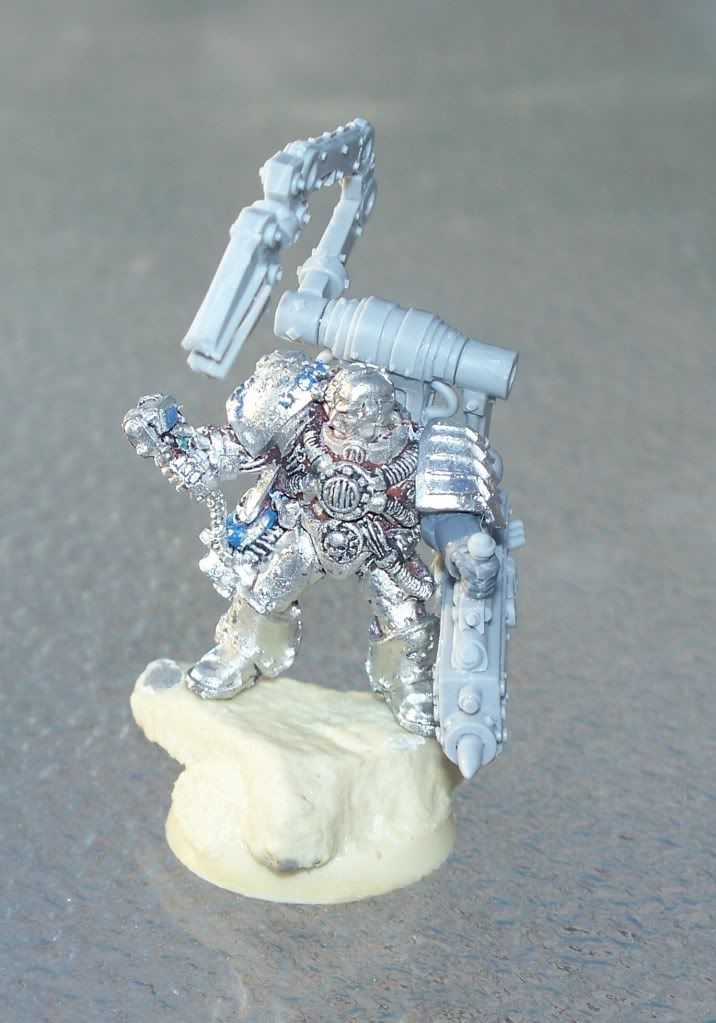
The kit is flexible enough that you can do a number of poses with it and the resin glued together nicely (as resin tends to do). I did clip off the edges of the servo arm; one of mine was bent (accidentally by me) and any attempt to fix it would have damaged it beyond easy repair. It is a great kit and rather than throw out some arbitrary system or rating I will merely say that I would recommend it to anyone who does not want to do up their own or use the one from Forge World.
Here is the finished product as well as the command squad I knocked out this last fortnight (as the speakers of the Queen's English would say):
And the command squad, not happy with how the white turned out:
The set came on the sprue pictured below. There was some flash (sarcastic gasp) which anyone who has ever molded their own product will tell you is an inevitable byproduct of the process but their molds went together well and there were no bubbles.

My only complaint is that on their website, at the time I assembled this model and at the time I am making this post, there is no picture of how it should go together. When you understand that what you see is your choice of two different backpacks, assembly is then fairly obvious but it took some head-scratching to finally figure it out and a picture is worth a thousand words as they say.
Here is my assembled product mounted on a recycled techmarine, you will not I used one of their shoulder pads as well:


The kit is flexible enough that you can do a number of poses with it and the resin glued together nicely (as resin tends to do). I did clip off the edges of the servo arm; one of mine was bent (accidentally by me) and any attempt to fix it would have damaged it beyond easy repair. It is a great kit and rather than throw out some arbitrary system or rating I will merely say that I would recommend it to anyone who does not want to do up their own or use the one from Forge World.
Here is the finished product as well as the command squad I knocked out this last fortnight (as the speakers of the Queen's English would say):


And the command squad, not happy with how the white turned out:

Monday, October 24, 2011
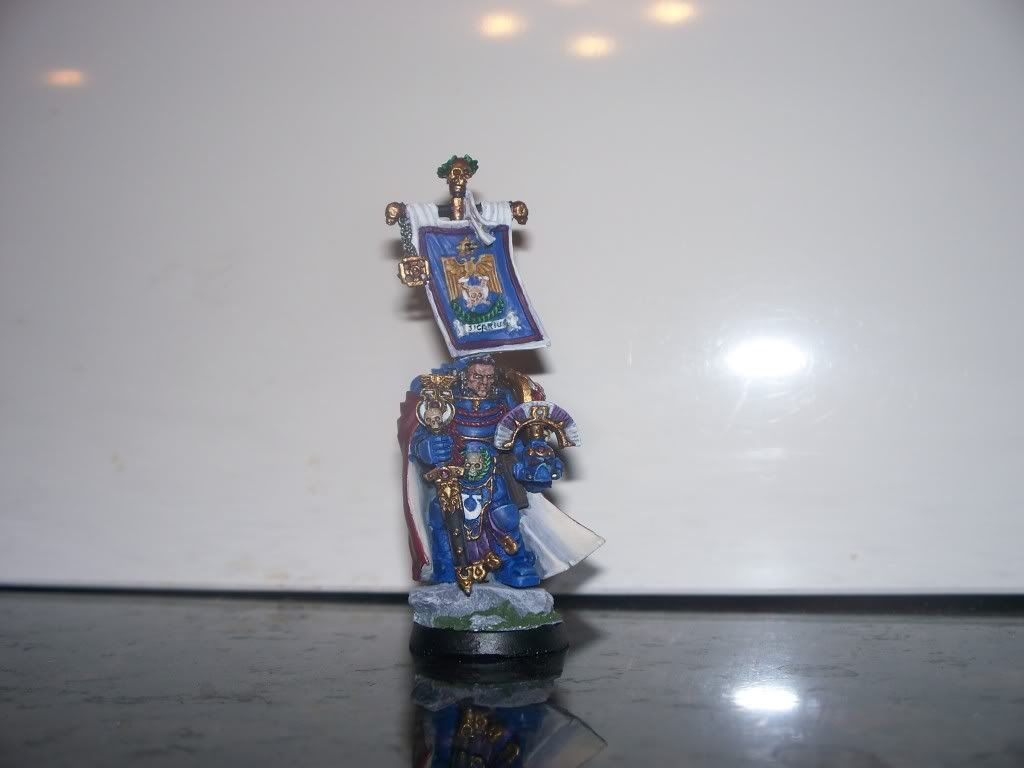
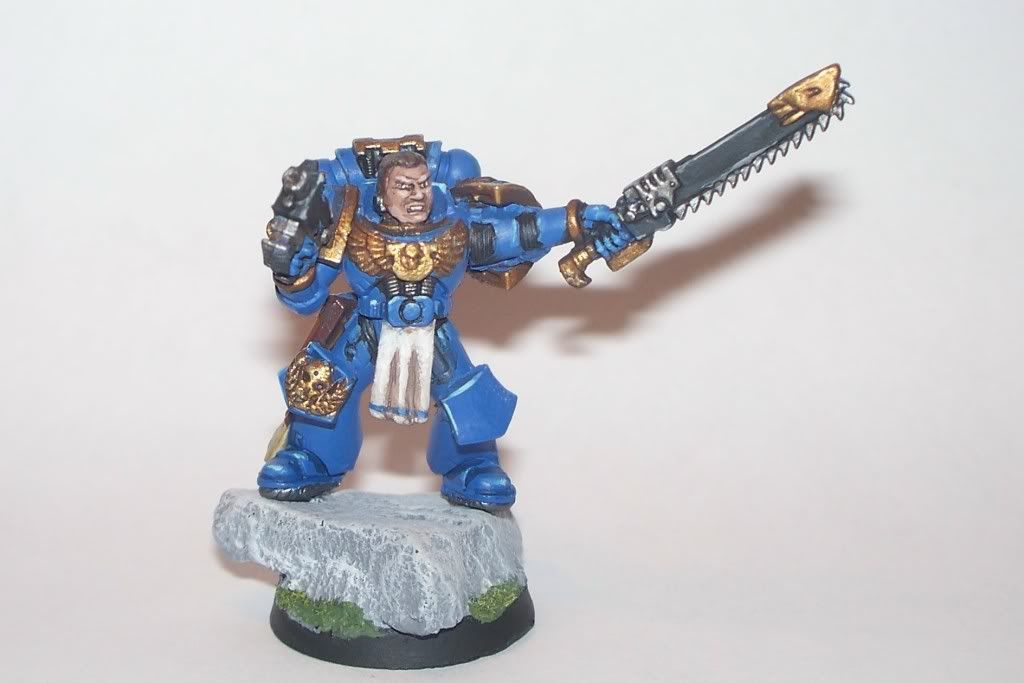
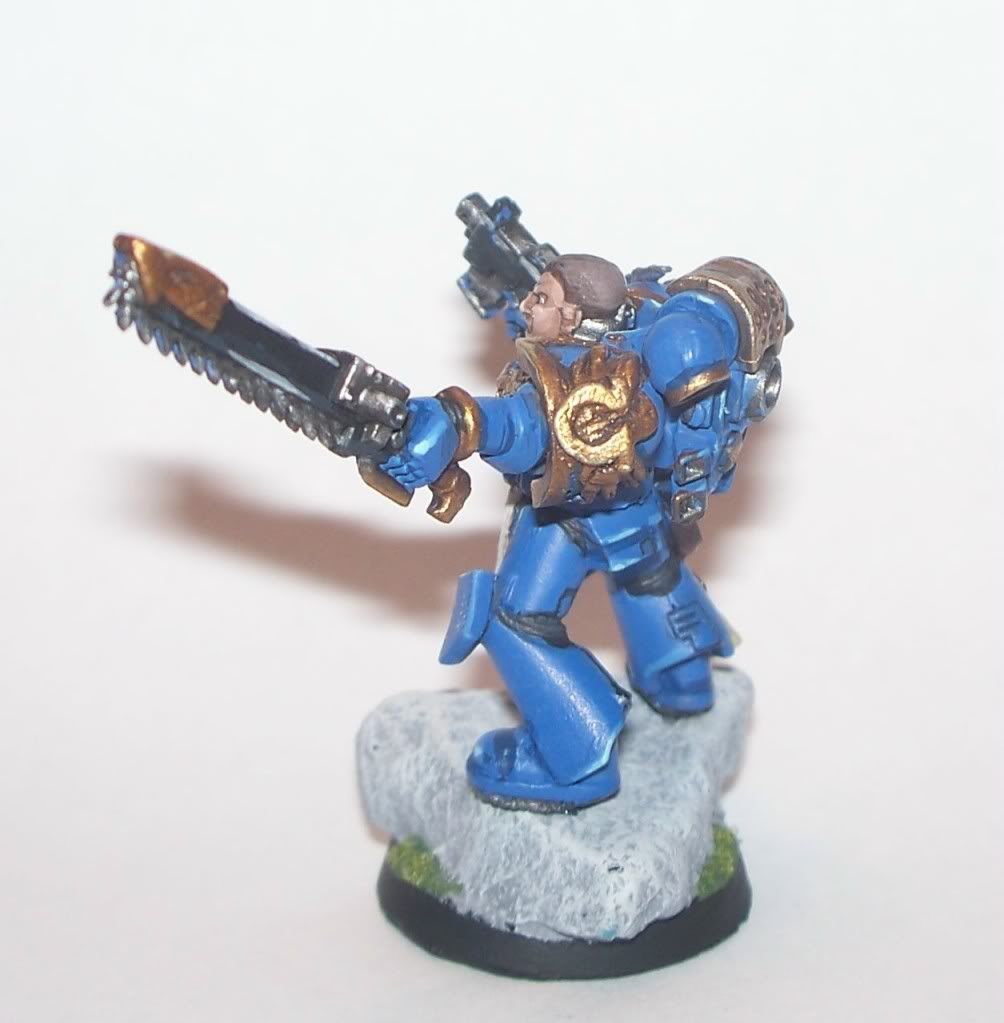
Sic-Sic-Sicarius!
That makes more sense when you sing it o Duran Duran's "Notorious." It also dates me.
Anyway, Here is my glorious 2nd Company leader. I actually started him in Virginia and had to put him on hold until recently. Not dispelased with how he turned out but he also represents the current upper limit of my skill. I also demonstrates that this house has no ambient light and I need to remake my photography area becuase pictures keep coming out either way to light or way to dark.
Anyway, Here is my glorious 2nd Company leader. I actually started him in Virginia and had to put him on hold until recently. Not dispelased with how he turned out but he also represents the current upper limit of my skill. I also demonstrates that this house has no ambient light and I need to remake my photography area becuase pictures keep coming out either way to light or way to dark.

Saturday, October 22, 2011
For the Tots Completed!
I actually completed these last week and sent them off:
Las Cannon Teams:

Missile Launcher Teams:
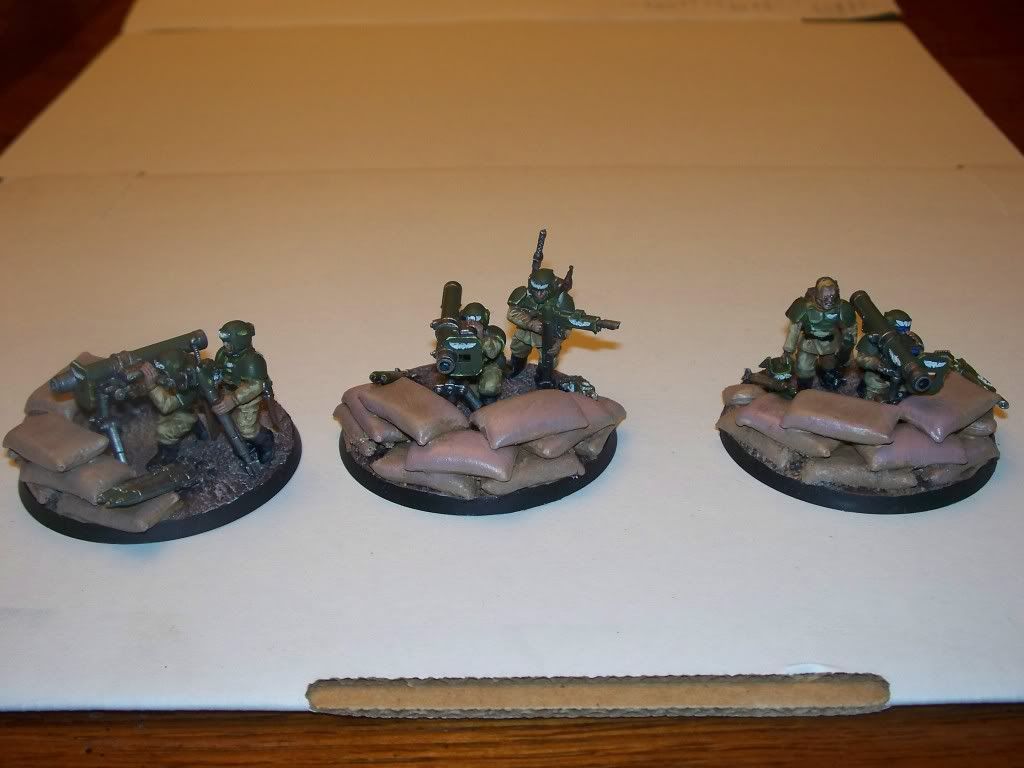
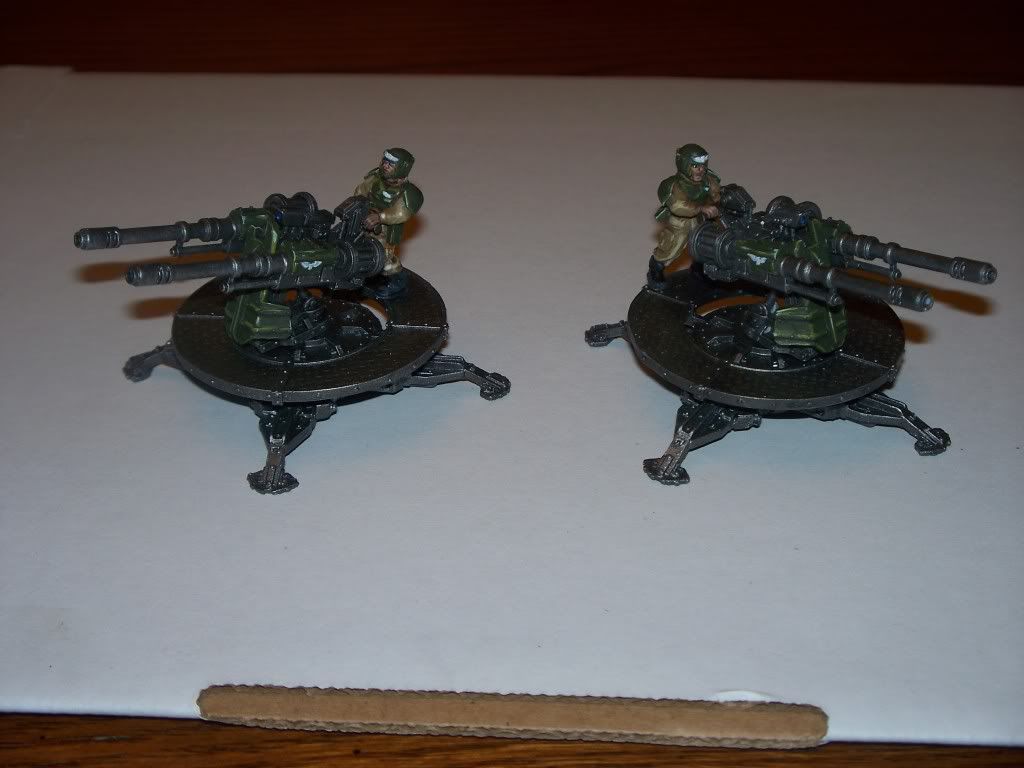
Sabre Defense Platforms:
Rejoyce tots.
Las Cannon Teams:

Missile Launcher Teams:

Sabre Defense Platforms:

Rejoyce tots.
Tuesday, October 11, 2011
In The Mean Time
The TfT project is coming along nicely and I expect to finish them off in the next day or two.
However, one project I was able to knock out inbetween painting was these nifty Ultramarines objective markers:
However, one project I was able to knock out inbetween painting was these nifty Ultramarines objective markers:

Saturday, October 1, 2011
For the Tots-2011!
This year's theme is Imperial Guard and so the Freebootaz are putting together three IG regiments. I will be contributing to the standard Cadian-style regiment the following; two Sabre Defense platforms (again, thanks Steve!) and two heavy weapon teams.
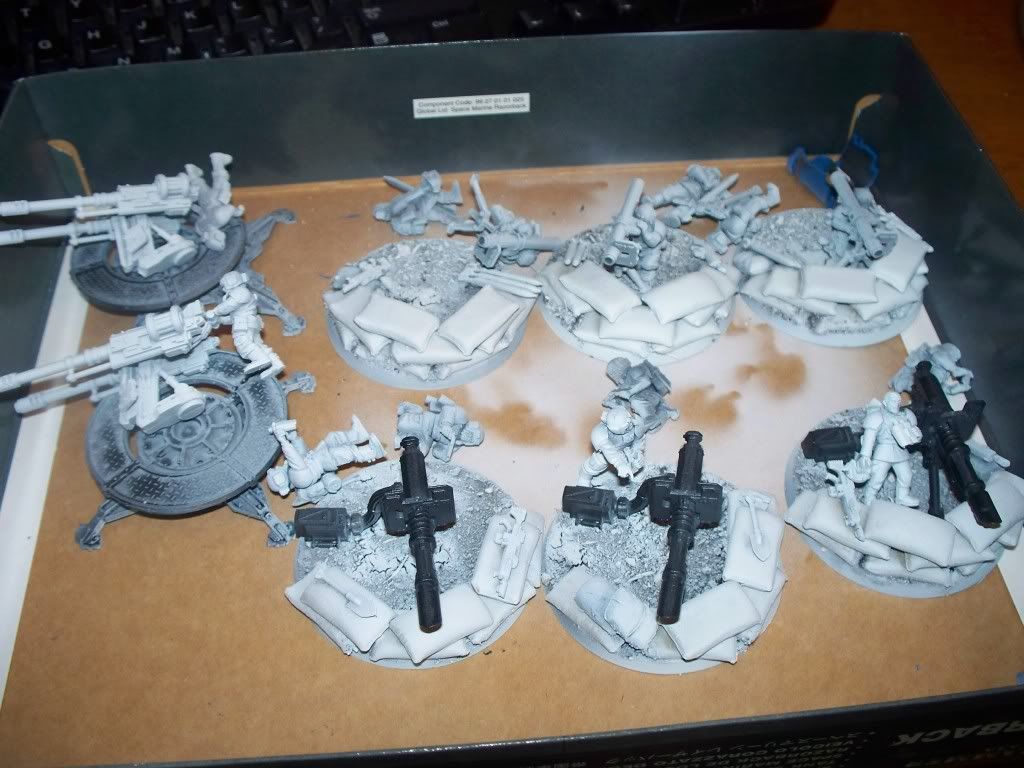
I hope to give the teams a miniature diorama feel so I've tried to goo all out with detail. Or as least as much as you can fit on a 60mm basis with sandbags and teh like.
The regiments will be offered up on Ebay. I'll post the link when the time comes.

I hope to give the teams a miniature diorama feel so I've tried to goo all out with detail. Or as least as much as you can fit on a 60mm basis with sandbags and teh like.
The regiments will be offered up on Ebay. I'll post the link when the time comes.
Tuesday, September 20, 2011
Captain Titus
40K Radio is wanting to plaster their new digs with miniatures and announced a contest for a life size (non-functional unfortunately) chainsword. Runners-up (which is what I'm aiming for) get T-shirts or something. The subject is to convert a model to look like Captain Titus from Space Marine the videogame. This meant some serious putty work to bulk up the face (I used a Space Wolf as the base but the cheeks were to think so I had to muscle it up), and the heraldry. On one shoulder I was able to cheat from existing parts but for the "U" on the chest, the figure's left shoulder, loincloth, knee-pad decoration, and the chain sword I pushed my skills to the limit. Which is not very far really. The knee pads themselves are made from carved-down Terminator shields I had. The rest of the parts were standard kit. The base is from the batch I created and molded myself. Enjoy:


Wednesday, September 7, 2011
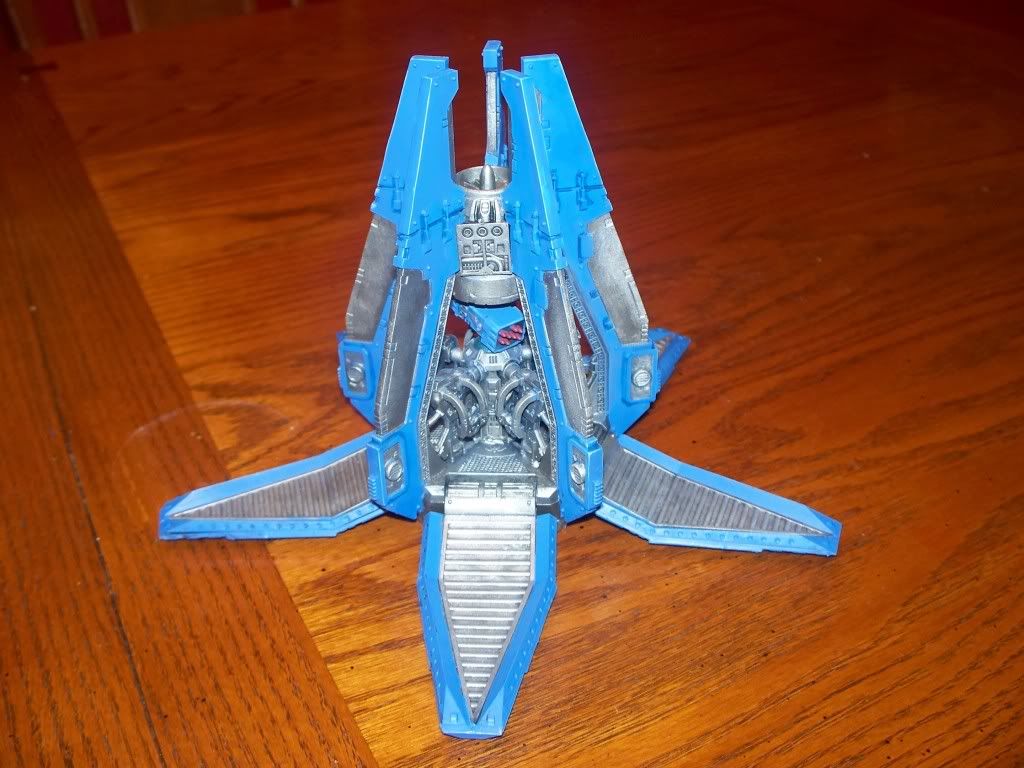
Land Raider
Next up I'm torn between submitting an entry for the 40K Radio competition, starting my donation for the Toys for Tots army or working on some converted Honor Guard since GW is taking its sweet time converting those over to finecast (yes, I know two come with the Calgar set but that is waaay to few). I also purchased the Conversion Beamer from Chapterhouse Studios so I will be doing a product review on that in the near future.
Meanwhile:
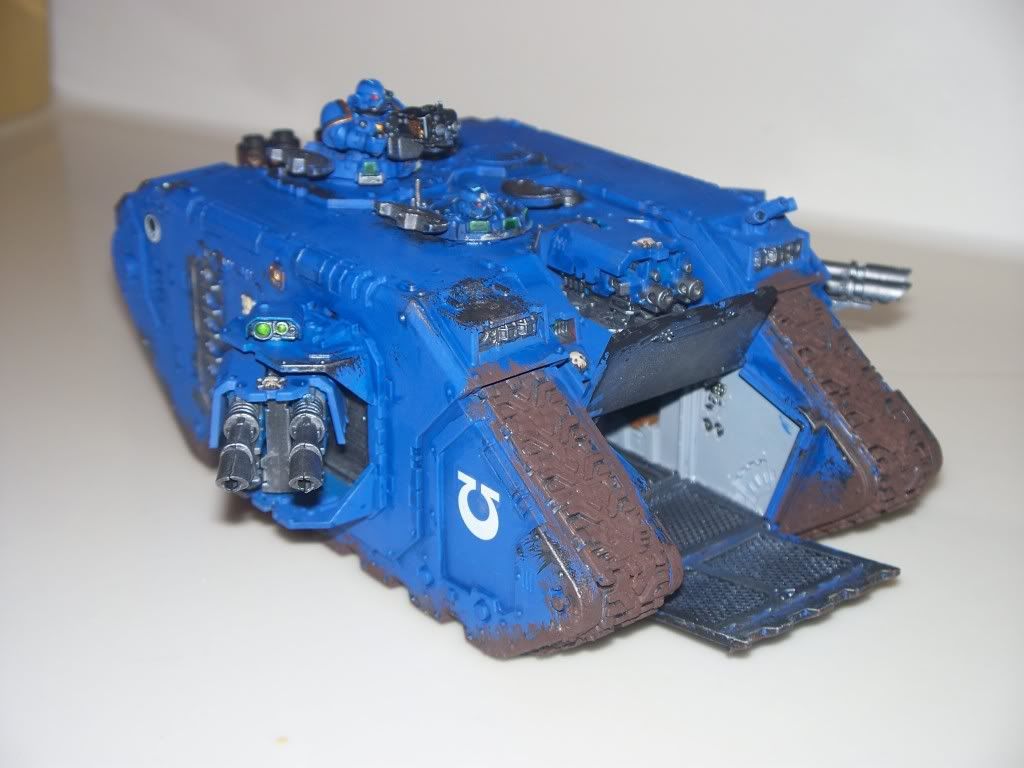
Happy with how it turned out although I may have gone a little too heavy on the damage on some parts.
Meanwhile:

Happy with how it turned out although I may have gone a little too heavy on the damage on some parts.
Saturday, August 27, 2011
A Tip for Keeping GW Paint Pots Open
Sure, dipping your brush directly into the paint pot is death incarnate to the bristles. GW, with only your best interests at heart, has been kind enough to engineer awat the ability to leave the lid open, removing the danger for you by making it impossible to get the paint out. Conveniently it also denies you the ability leave the pot open for any other reason you might want to. Well I don't need them to save me from myself and after much frustration the technique to keep the fething pots open came to me in a flash of inspiration from parts lying around:
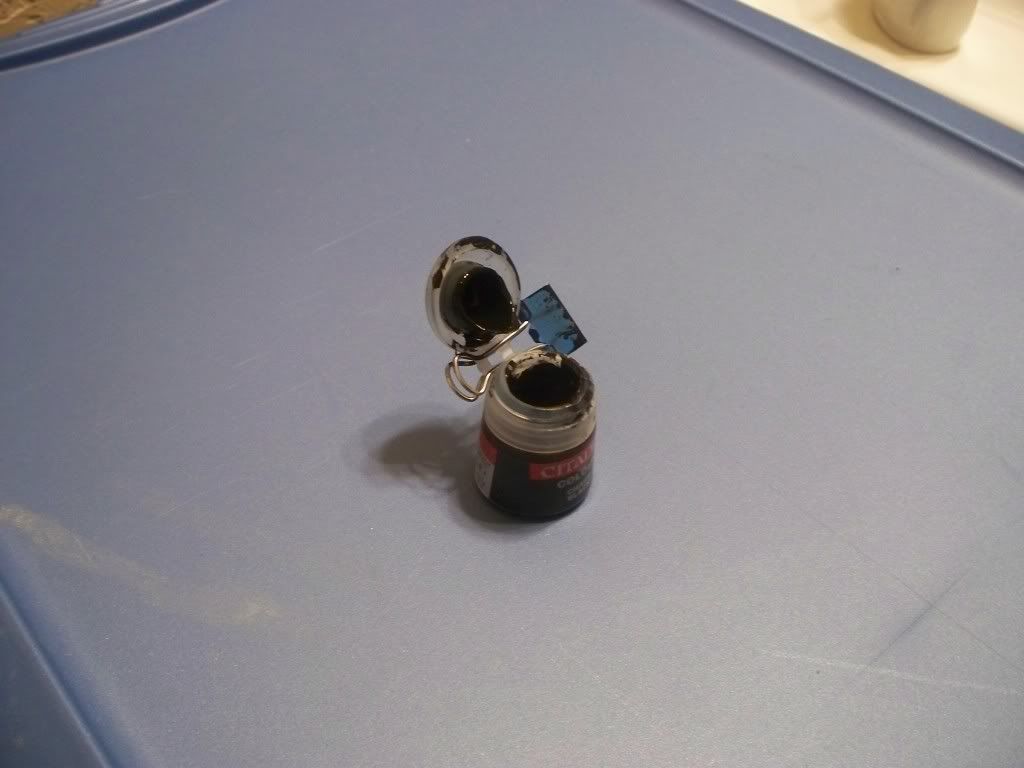
Take that GW, now that paint will dry out faster and I'll have to buy more from you whether you wanted me to or not!
Winning.

Take that GW, now that paint will dry out faster and I'll have to buy more from you whether you wanted me to or not!
Winning.
Back on Altitude: Ultramarines for July and August
Got caught up with my July and August 40K Radio Freebootaz Motivational Painting Challenge entries. With work heating up it has been an effort to get them done in time but I am extremely please with the results. On the down side, money is still tight and I don't have a good location in the new house so I have not set up a new photography area so the effect is varied as you will see:
With flash:
And without:
Overall the painting challenge has been fun but I think one problem is that in many ways it slows me down by forcing me down a certain path that I may or may not want to go. I will probably not do next years for several reasons, not the least of which I am sort of topped off on armies for the time being are really just need to catch up a few pieces. I've got some guard projects that are being delayed as well as that Thunderhawk upgrade I keep telling myself I am going to get around to doing some day. I would also like to expand my terrain and maybe add some sections to the gaming board that I never seem to get around to playing on.
With flash:


And without:


Overall the painting challenge has been fun but I think one problem is that in many ways it slows me down by forcing me down a certain path that I may or may not want to go. I will probably not do next years for several reasons, not the least of which I am sort of topped off on armies for the time being are really just need to catch up a few pieces. I've got some guard projects that are being delayed as well as that Thunderhawk upgrade I keep telling myself I am going to get around to doing some day. I would also like to expand my terrain and maybe add some sections to the gaming board that I never seem to get around to playing on.
Sunday, August 14, 2011
The Joys of Moving, a Book Recommendation, and a Shout Out to Battlefoam
Okay, the move in complete and some normality (normalcy?-whatever) has been returned but I am now way behind on my monthly challenges for July and August. I still managed to get some hobby related things accomplished despite everything getting packed up and shipped off; a friend gave me some Aegis Defense Lines. Actually he gave me four. I cannot thank him enough to be frank. So again, thank you Steve.
Let me also recommend that you all pick up a copy of his novel that he wrote with his wife, "Powerborn" that was recently published. I don't tolerate crap fantasy well so the fact that he is my friend aside, it is a fantastic novel filled with fully fleshed out characters and art (yes art!) that you will not see in contemporary fantasy novels. Check it out on their website www.nenethomas.com
I also transported some GW Primer and Army Painter Primer from Oklahoma City (yet another shout out to New World Comics and Games) to Corpus Christi in the middle of a massive heat wave without letting it get hot. I believe this is one of the reasons it turns to garbage and comes out textured. Cool for some bits of terrain, conniption-inducing for those miniatures you worked really hard at putting together. Finally I have stared painting a ten-man squad of assualt marines and a five-man squad of terminators. I figure these will take me until the end of August and into September.
Not sure about the local gaming scene. I've set food in what appears to be the only gaming store in town and, well to be fair the guy is willing to special order but does not have a large stock. Frankly, the store is more of a Magic: The Gathering and LAN gaming spot with a smidgeon of Warhammer, 40K and Warmachine. The jury will remain out until I can give him a fair shake.
Last, a shout-out to Battle Foam. Everything packed in my cases survived intact but more importantly, I purchased two extra trays to cover some extra items. The packers, being the geniuses that they are, put them beneath heavy books in the boxes they all went in. Despite that, and a little worse looking for wear, the trays did their job and they managed to protect everything. Thanks Romeo.
Primed for action (some of the last of my old blue)


Wednesday, July 6, 2011
Fething Real World
I am forced to admit that I will be going on a gaming hiatus for probably the next full month until my life resets in my new home (exact location TBD) in Corpus Christi. The is no realistic way I will be able to get any hobbying in due to the varant nature (again, no home) of the transition. This means nada for the monthly Freebootaz challenge which is painful-I have an almost perfect score of gold up to this date. Sometimes the paint brushes take a back seat and this is going to be one of those time.
Friday, June 24, 2011
The Joys of Travel
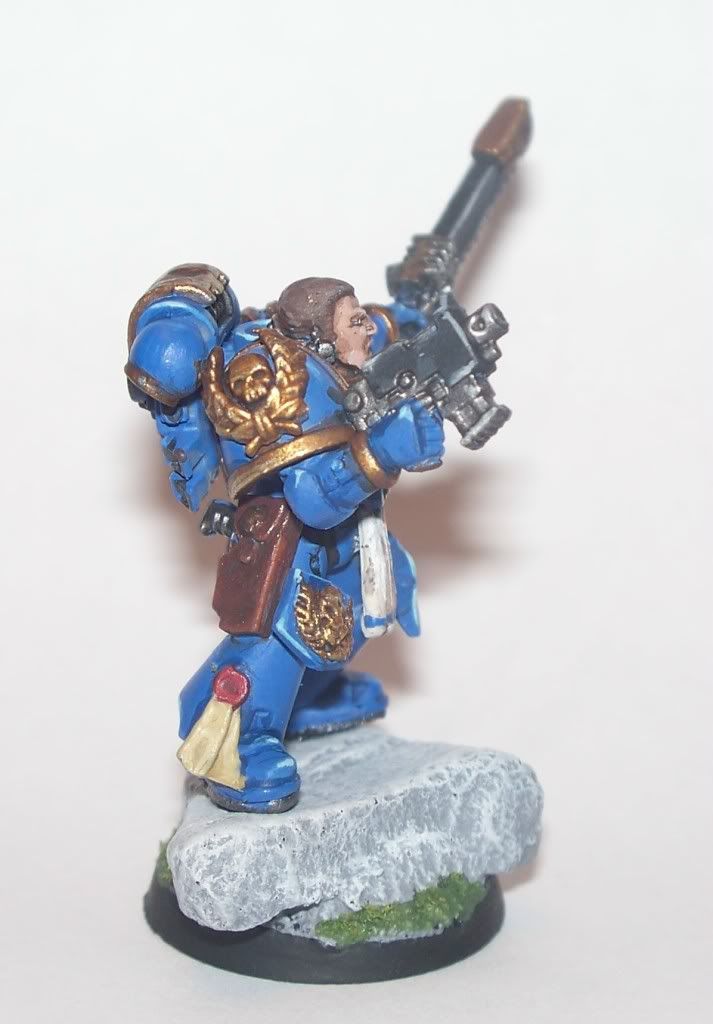
I had to go out of town for some specialized training (involved literally being blindfolded and flipped upside down under water among other things-compare that to your average "trust exercise). The upside of which was I had some spare time on my hands in a place that I had no real reason to explore so I got my second squad of devastators painted. That puts me five squads into the Ultramarines project.
I've also got a special character about half finished and the Heresy Era Devastators prepped but I may hold off and get July and August's Freeboota challenges prepped; I will probably not have much time to paint in the near future so getting them ready now would go a long way.

I've also got a special character about half finished and the Heresy Era Devastators prepped but I may hold off and get July and August's Freeboota challenges prepped; I will probably not have much time to paint in the near future so getting them ready now would go a long way.
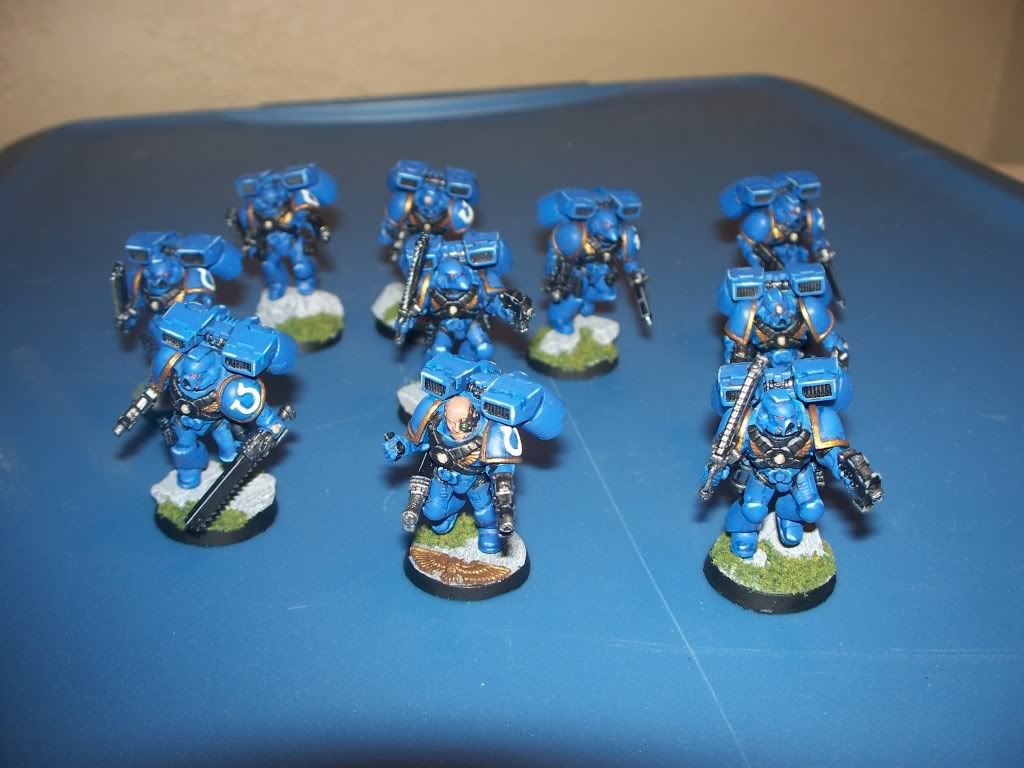
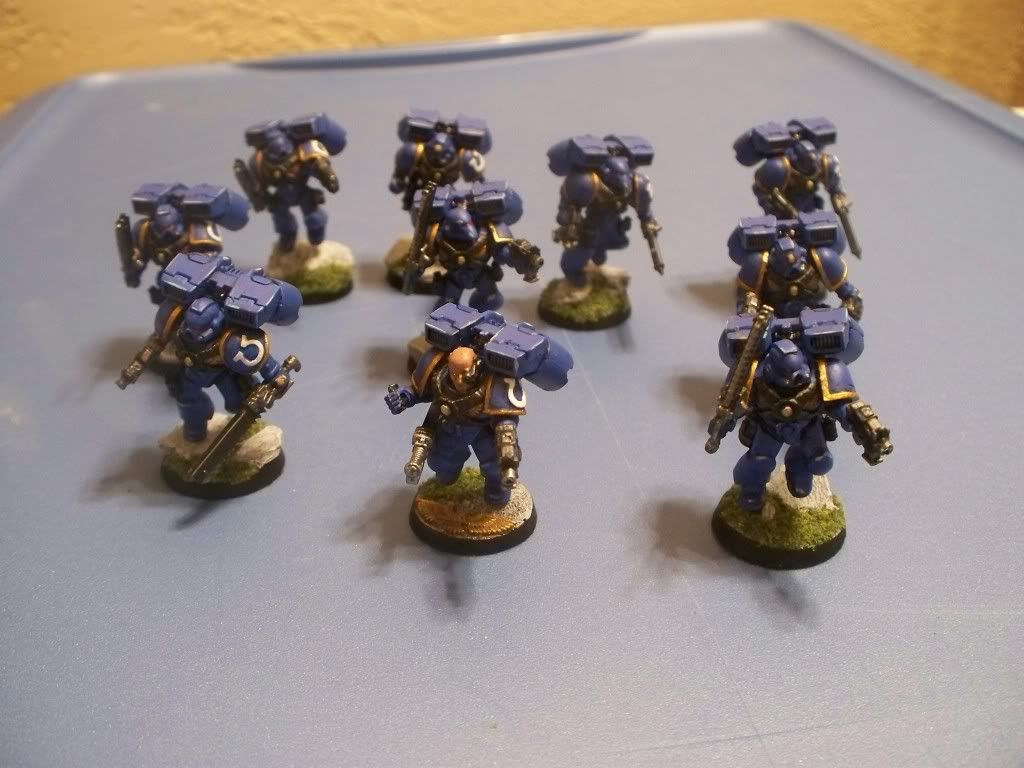
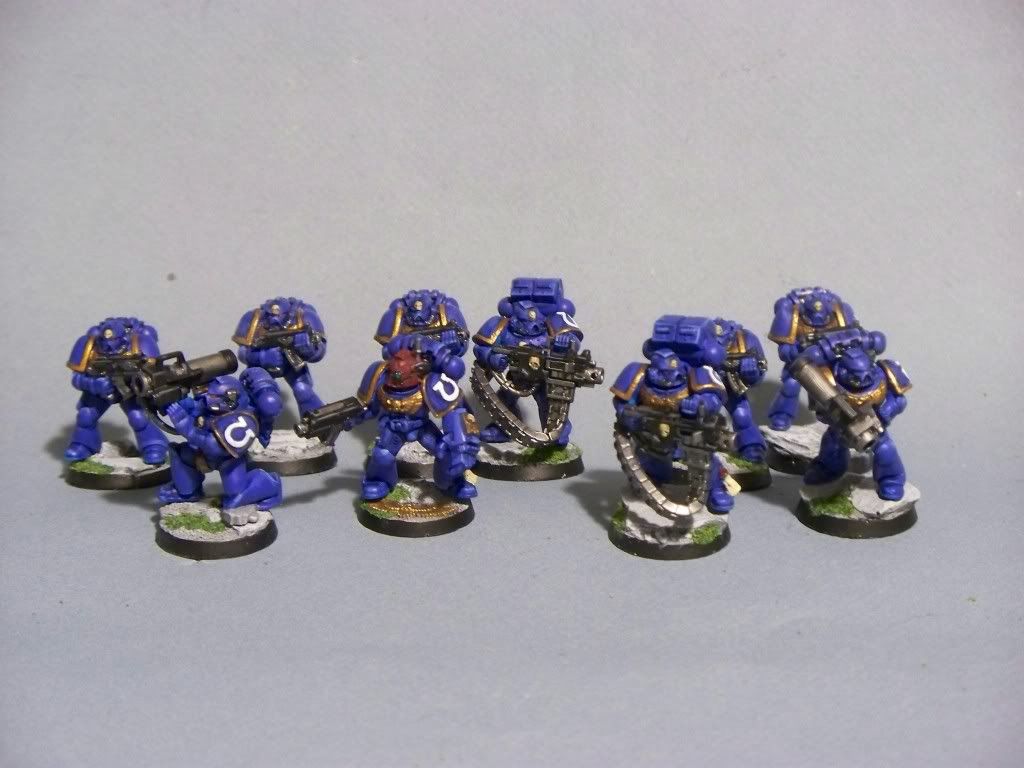
Month, er, Two Weeks of Devastation!!!! (Late Entry)
My project for this month is to knock out my Ultramarines Devastator Squads both for the "modern" army and the Heresy Era army. Painting has really taken longer these last two months for some reason; stuff that I would knock out in 5 days has taken two weeks. Case in point; these guys:
So I got one squad done. I will be doing some travelling soon so without "the burden of work and family" to quote Homer Simpson I will be able to get a couple nights of uninterrupted painting in. Arguably I'd rather have the wife and kids along but getting caught up in painting is a nice second place.
Astute observers will recognize the 2nd Ed plastic marines in the squad. I'm using them to fill out both this and the second devastator squad (2 ML's and 2 HB's) of the modern army. The are decent enough figs that I don't want them to go to waste but since they are traditionally min-maxed out to fit in Razorbacks or to shave a couple of points it is fitting that they will be the first to get dropped. I also need to go back and do decals for both them and the tactical squads I have already done. I wanted to maximize using the moulded shoulder pads but alas-for too many figures it was just not practical.
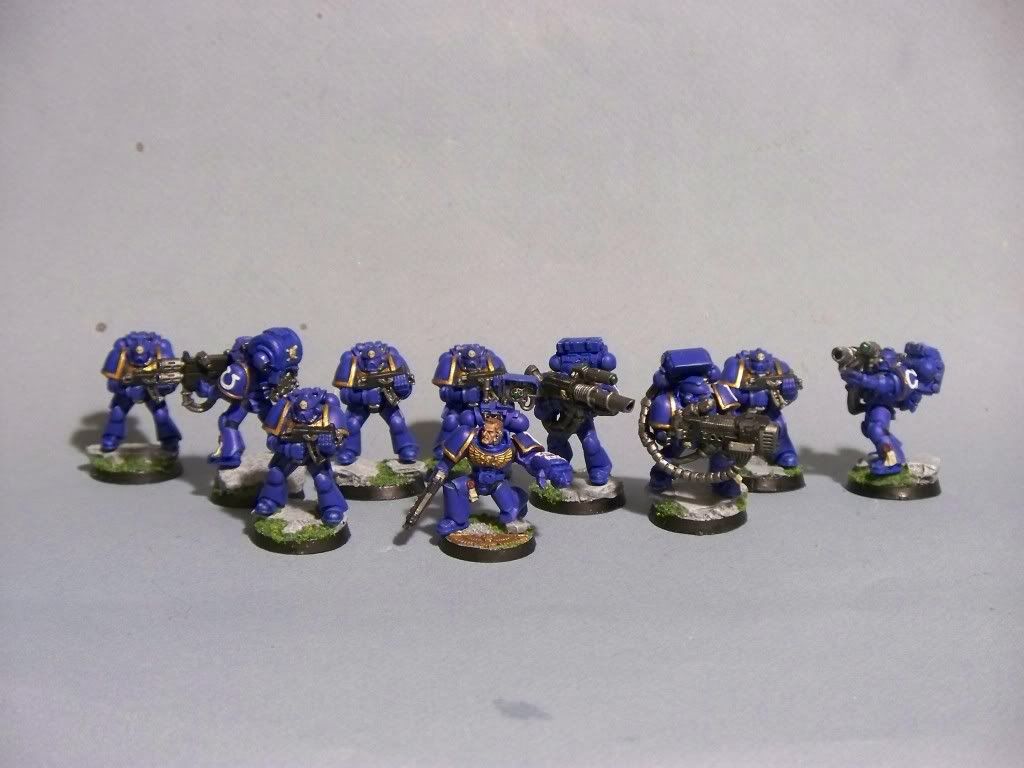
Incidentally, I also got these guys done up: I'm still getting caught up with the rest of the command squad and Captain Sicarius. You will note the name of the champion (I need to clean up the lettering): Thebus. This is a reference/joke (for all you Ultramarines haterz) to the Sacred Band of Thebes. To get why this is a joke, look them up on Wikipedia.

So I got one squad done. I will be doing some travelling soon so without "the burden of work and family" to quote Homer Simpson I will be able to get a couple nights of uninterrupted painting in. Arguably I'd rather have the wife and kids along but getting caught up in painting is a nice second place.
Astute observers will recognize the 2nd Ed plastic marines in the squad. I'm using them to fill out both this and the second devastator squad (2 ML's and 2 HB's) of the modern army. The are decent enough figs that I don't want them to go to waste but since they are traditionally min-maxed out to fit in Razorbacks or to shave a couple of points it is fitting that they will be the first to get dropped. I also need to go back and do decals for both them and the tactical squads I have already done. I wanted to maximize using the moulded shoulder pads but alas-for too many figures it was just not practical.
Incidentally, I also got these guys done up: I'm still getting caught up with the rest of the command squad and Captain Sicarius. You will note the name of the champion (I need to clean up the lettering): Thebus. This is a reference/joke (for all you Ultramarines haterz) to the Sacred Band of Thebes. To get why this is a joke, look them up on Wikipedia.

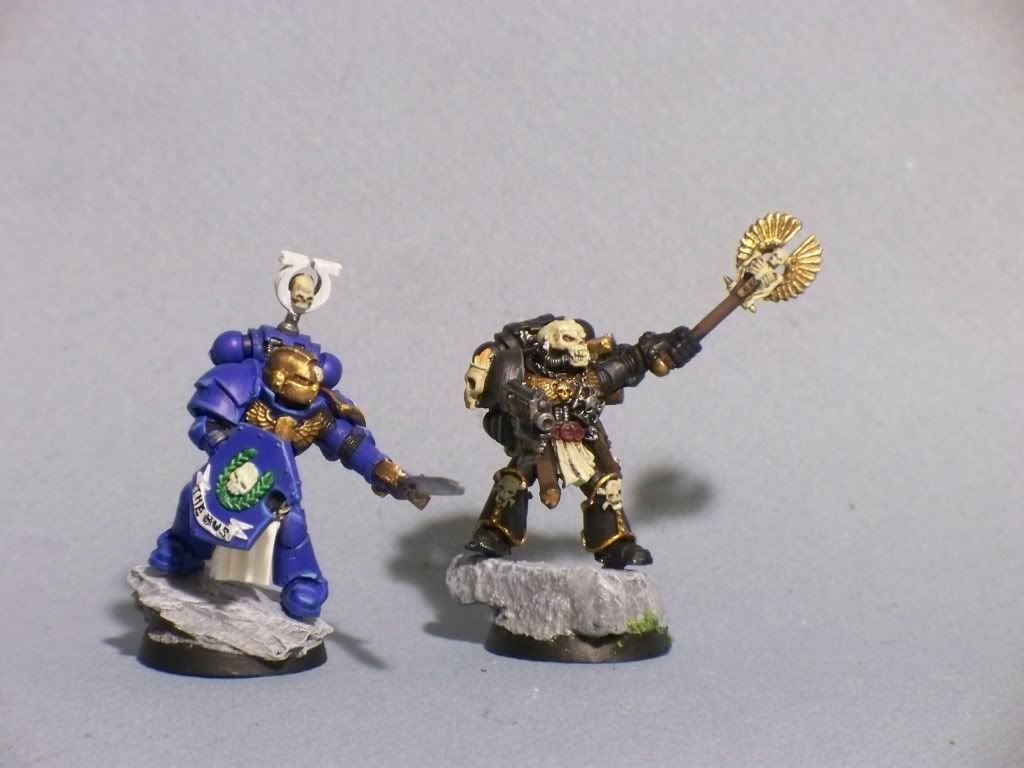
Monday, May 23, 2011
I See Fallen Angels

Now if only Cypher had rules. In the mean time they are my Chaos Chosen Elites and I guess he'll be some sort of champion or something. Details, details.
Subscribe to:
Posts (Atom)