

Saturday, November 26, 2011
Thursday, November 24, 2011
Working with Polyester Resin and the Sweet Smell of Failure and Success
By polyester I am not referring to this:

I'm referring to polyester resin:
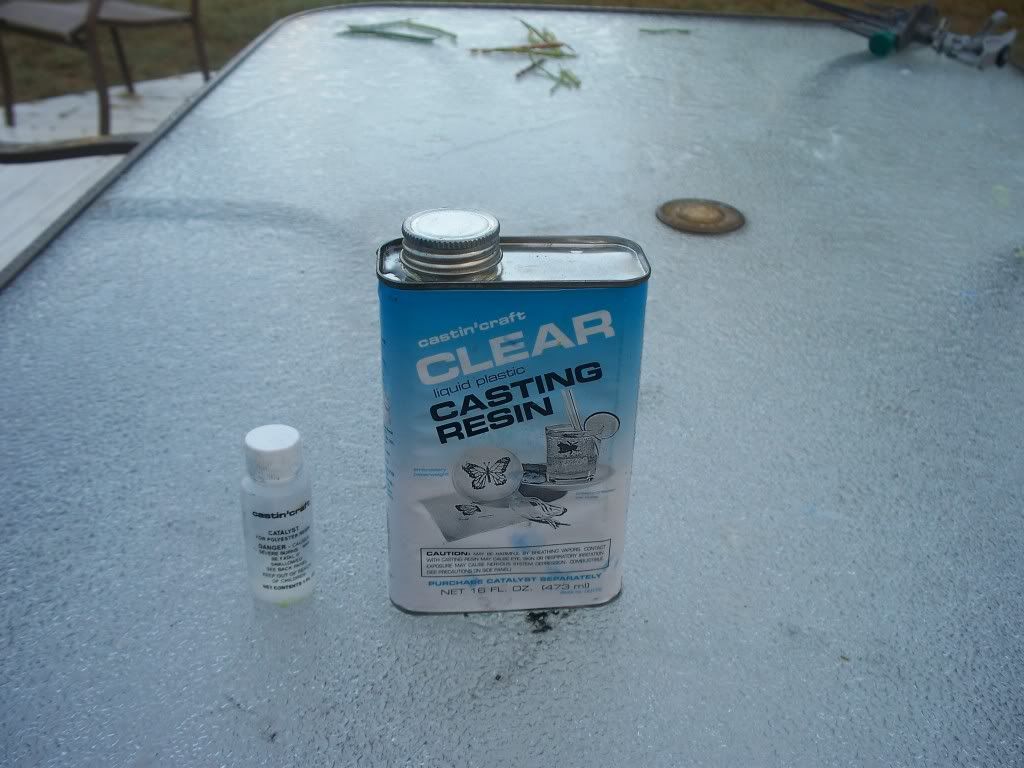
What is Polyester Resin?
Polyester resin is different from the kind of resin we usually use in that it is clear and rather than being comprised of two parts you mix in equal amounts (Alumilite brand resins for example), you have the resin and a hardening agent. Other things to consider (and this lead to a load of headache for me) is that it is much slower to harden than the two-stage resins. In fact, there is no set resin time. In my research the universal answer was that it depended on temperature, humidity, amount used, thickness, and the amount of dye added. There are ways to accelerate the process but we will get to that in a minute. The other thing is that far more than two-stage resins, this stuff puts of fumes. Massive fumes. Massive as in I was working with it outside on a 15-20 mile an hour wind day and still getting a headache from working with this stuff. You can add dyes to color the resin. More on this below. Similiarities; you will use all the same tools as the two-stage resis and for the love of everything holy, use gloves.
Why Use Polyester Resins?
If you want to make something clear such as a water effect, crystals, or Reanimation Protocol markers which is the source of this endeavor. A disclaimer, I do not endorse or in any way support the copying of licensed miniatures. However, if you have created your own original miniature or detailed item and wish to copy it, polyester resin is not the right medium. Why? Other than the difficulty stated before, it just does not flow in my humble opinion, as well as two-stage resins and loses some of the detail when you remove it from the mold if it is not completely hardened. Again, for the project I used it for, it sufficed.
What I Did and Lessons Learned
For my Deepstriking Santa gift for the 40K Radio Freebootaz, I wanted to give my recipient (identity to remain secret) some Ressurection Protocol markers.
Step 1: Create Markers
Pretty easy-I sacrifices some extra warriors for the cause and built up markers on 25mm bases:
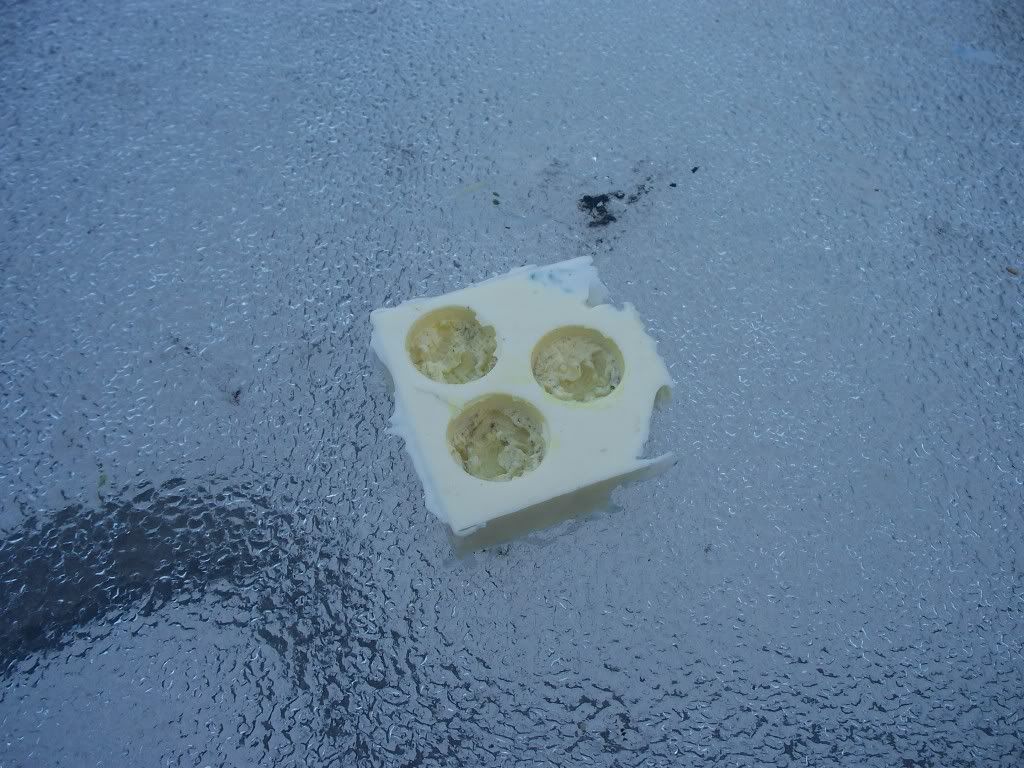
Step 2: Create Mould
Using Alumilite mold-maker, I made a mold. So far nothing new.
Step 3: Fail
Pour the resin:
Mix the resin and the dyes in a container until you have the right color you are looking for. Then pour an amount equal to what you need for a single batch into a smaller container and add the catalyst. Fill the molds. I strongly recommend having additional molds available for any extra resin that you don't use in the mold. In this case I had some crystal molds that suited this purpose well. Make sure you keep the completed molds in a warm dry place. When exposed to humidity they started to fog on the surface but once put in drier air the fog went away.
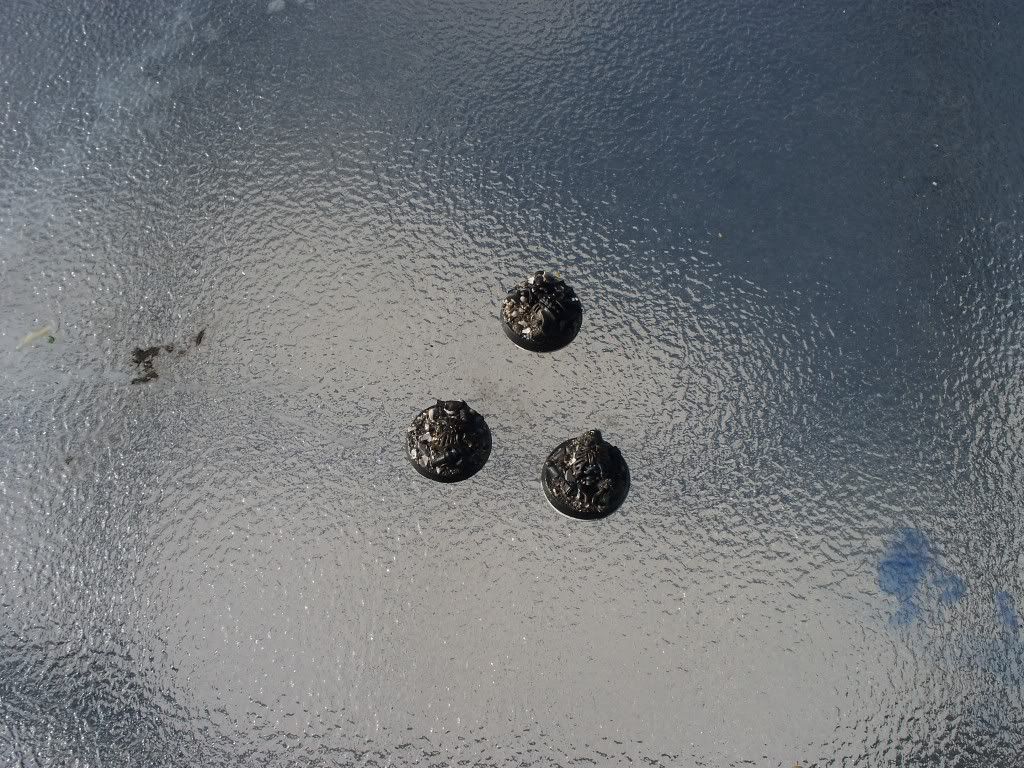
Test batch 1-3:
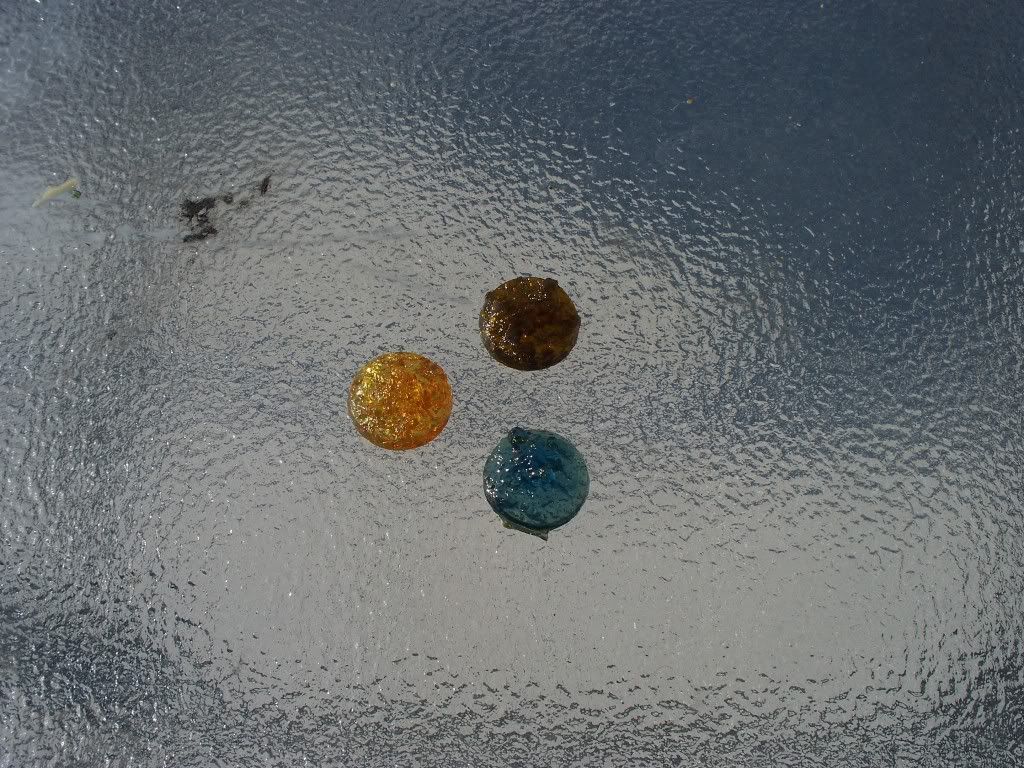
Sure they look fine (and with some primer they will do the job nicely) but I wanted neon green markers. So what went wrong?
Dyes
I pointed out you can by dyes to put in the resin. The dyes look like food coloring only the medium is something compatible with resin rather than water. Herein lies the problem. Simply put, the yellow sucks. It is that same orange color that food coloring is made of and when I mixed in the blue (which worked fine) it created a nasty brown-green rather than the bright green I wanted. After some experimentation I learned that you can use yellow ink or even green paint (although if you use the paint it will be more translucent than clear) to dye. This will add to drying time of course.
Hardening Time and How to Jack it Up
Which brings us to failure number two. I told you that you add drops of catalyst to harden the resin (technically you are accellerating the hardining process-it is hardening at a glacial pace the moment it is made). Again, this is not quite the straight up process as it is with the two-stage resins. Here you add not only by mass but by thickness of what you are molding. So I added differing amounts on different batches and the results were usually about the same; a sticky mess the consistency of thick gelatin after about an hour. This is where a little detail is going to be lost as some resin is left in the mold. Now yes I could have left it in their for eight to ten hours each but I am also on a timeline to get this stuff done in so it can reach my recipient something close to Christmas. Frankly between an hour and three hours there was no real difference. Remember the gloves reference? That's because this stuff comes out sticky. Really, really sticky.
So what do you do with sticky markers since that makes a sub-optimal gift? I tried accelerating the process by putting them in the oven. Big mistake. First, I used 300 degrees F and it took forty-five minutes to finally harden. Second attempt I tried to speed it up and used 350. Remember the fumes I mentioned? In both cases the entire house wound up smelling like a chemical factory. This in turn brought retribution from the spouse and this process was abandoned. In addition, the 350 degrees caused the markers to harden too fast and crack (also a side effect of using too much catalyst) and worse, they went from a passible green to a nasty brown as the dyes were burnt.
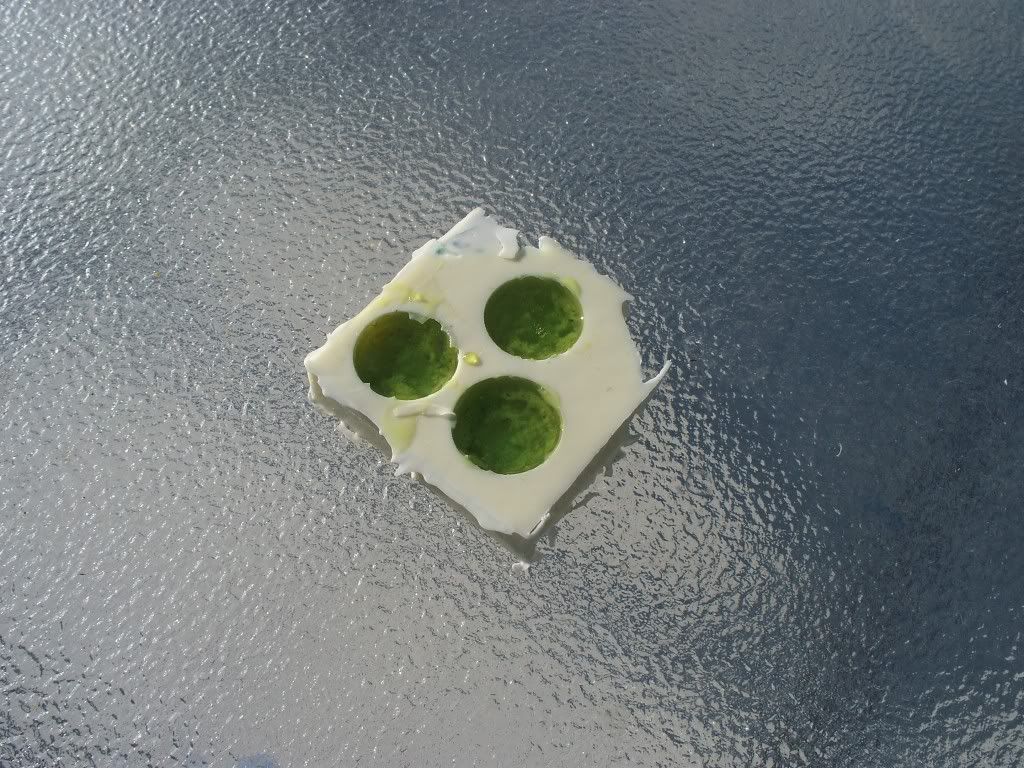
Step 4: Reattack and Use Patience
Success!
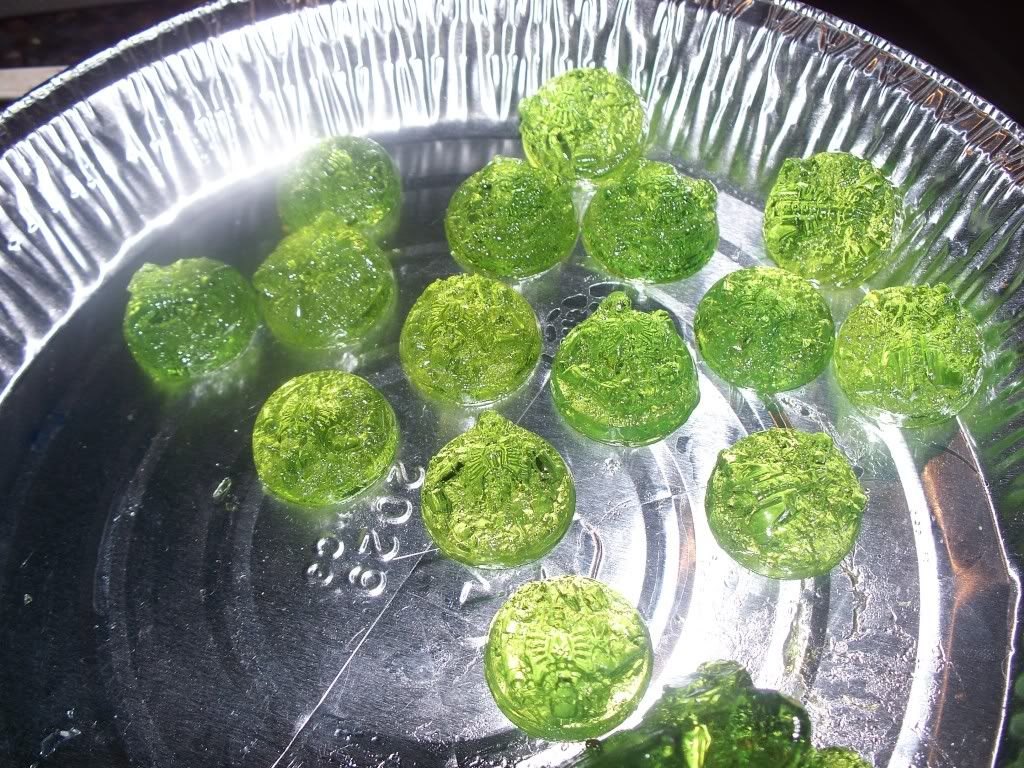
What did I do differently? Once I de-moulded the markers I put them in the pie plate and let them sit for a day in a warm dry place. In time the catalyst and molecular nature did their jobs without my interference and the result is what you see below. On the down side, I have used so much resin that I only have enough for a couple more batches. I plan on using the failure by priming them and painting them for myself; primer seems to stick to the resin just fine and with a nice coat of paint, no one will know my shame.

I'm referring to polyester resin:

What is Polyester Resin?
Polyester resin is different from the kind of resin we usually use in that it is clear and rather than being comprised of two parts you mix in equal amounts (Alumilite brand resins for example), you have the resin and a hardening agent. Other things to consider (and this lead to a load of headache for me) is that it is much slower to harden than the two-stage resins. In fact, there is no set resin time. In my research the universal answer was that it depended on temperature, humidity, amount used, thickness, and the amount of dye added. There are ways to accelerate the process but we will get to that in a minute. The other thing is that far more than two-stage resins, this stuff puts of fumes. Massive fumes. Massive as in I was working with it outside on a 15-20 mile an hour wind day and still getting a headache from working with this stuff. You can add dyes to color the resin. More on this below. Similiarities; you will use all the same tools as the two-stage resis and for the love of everything holy, use gloves.
Why Use Polyester Resins?
If you want to make something clear such as a water effect, crystals, or Reanimation Protocol markers which is the source of this endeavor. A disclaimer, I do not endorse or in any way support the copying of licensed miniatures. However, if you have created your own original miniature or detailed item and wish to copy it, polyester resin is not the right medium. Why? Other than the difficulty stated before, it just does not flow in my humble opinion, as well as two-stage resins and loses some of the detail when you remove it from the mold if it is not completely hardened. Again, for the project I used it for, it sufficed.
What I Did and Lessons Learned
For my Deepstriking Santa gift for the 40K Radio Freebootaz, I wanted to give my recipient (identity to remain secret) some Ressurection Protocol markers.
Step 1: Create Markers
Pretty easy-I sacrifices some extra warriors for the cause and built up markers on 25mm bases:

Step 2: Create Mould
Using Alumilite mold-maker, I made a mold. So far nothing new.

Step 3: Fail
Pour the resin:

Mix the resin and the dyes in a container until you have the right color you are looking for. Then pour an amount equal to what you need for a single batch into a smaller container and add the catalyst. Fill the molds. I strongly recommend having additional molds available for any extra resin that you don't use in the mold. In this case I had some crystal molds that suited this purpose well. Make sure you keep the completed molds in a warm dry place. When exposed to humidity they started to fog on the surface but once put in drier air the fog went away.
Test batch 1-3:

Sure they look fine (and with some primer they will do the job nicely) but I wanted neon green markers. So what went wrong?
Dyes
I pointed out you can by dyes to put in the resin. The dyes look like food coloring only the medium is something compatible with resin rather than water. Herein lies the problem. Simply put, the yellow sucks. It is that same orange color that food coloring is made of and when I mixed in the blue (which worked fine) it created a nasty brown-green rather than the bright green I wanted. After some experimentation I learned that you can use yellow ink or even green paint (although if you use the paint it will be more translucent than clear) to dye. This will add to drying time of course.
Hardening Time and How to Jack it Up
Which brings us to failure number two. I told you that you add drops of catalyst to harden the resin (technically you are accellerating the hardining process-it is hardening at a glacial pace the moment it is made). Again, this is not quite the straight up process as it is with the two-stage resins. Here you add not only by mass but by thickness of what you are molding. So I added differing amounts on different batches and the results were usually about the same; a sticky mess the consistency of thick gelatin after about an hour. This is where a little detail is going to be lost as some resin is left in the mold. Now yes I could have left it in their for eight to ten hours each but I am also on a timeline to get this stuff done in so it can reach my recipient something close to Christmas. Frankly between an hour and three hours there was no real difference. Remember the gloves reference? That's because this stuff comes out sticky. Really, really sticky.
So what do you do with sticky markers since that makes a sub-optimal gift? I tried accelerating the process by putting them in the oven. Big mistake. First, I used 300 degrees F and it took forty-five minutes to finally harden. Second attempt I tried to speed it up and used 350. Remember the fumes I mentioned? In both cases the entire house wound up smelling like a chemical factory. This in turn brought retribution from the spouse and this process was abandoned. In addition, the 350 degrees caused the markers to harden too fast and crack (also a side effect of using too much catalyst) and worse, they went from a passible green to a nasty brown as the dyes were burnt.
Step 4: Reattack and Use Patience
Success!

What did I do differently? Once I de-moulded the markers I put them in the pie plate and let them sit for a day in a warm dry place. In time the catalyst and molecular nature did their jobs without my interference and the result is what you see below. On the down side, I have used so much resin that I only have enough for a couple more batches. I plan on using the failure by priming them and painting them for myself; primer seems to stick to the resin just fine and with a nice coat of paint, no one will know my shame.
Saturday, November 19, 2011
OT: Original Terminators and More Chapterhouse Goodness
Went old school (or rather saved myself at least 150 bucks) and converted over my old terminators to Ultramarines. I used some Chapterhouse Studios hammers and shields to convert what were regular terminators into Thunderhammer/Stormshield Terminators. However, for all my talk of using original terminators, many of the arms came from leftover bits from the new plastics. Because one of my T-hammer terminators is missing, I had to use the AoBR sergeant with a front plate swap (the idea of wearing the best armor the imperium has to offer but no helmet drives me crazy-except for the capitain where I didn't want to jack with the original figure). I also knocked out a Hunter Killer missle to swap out on my Land Raider.
I really like the shields and hammers and I think they work much better than the dinky shields the terminators come with. They have flourish worthy of 1st Company marines.
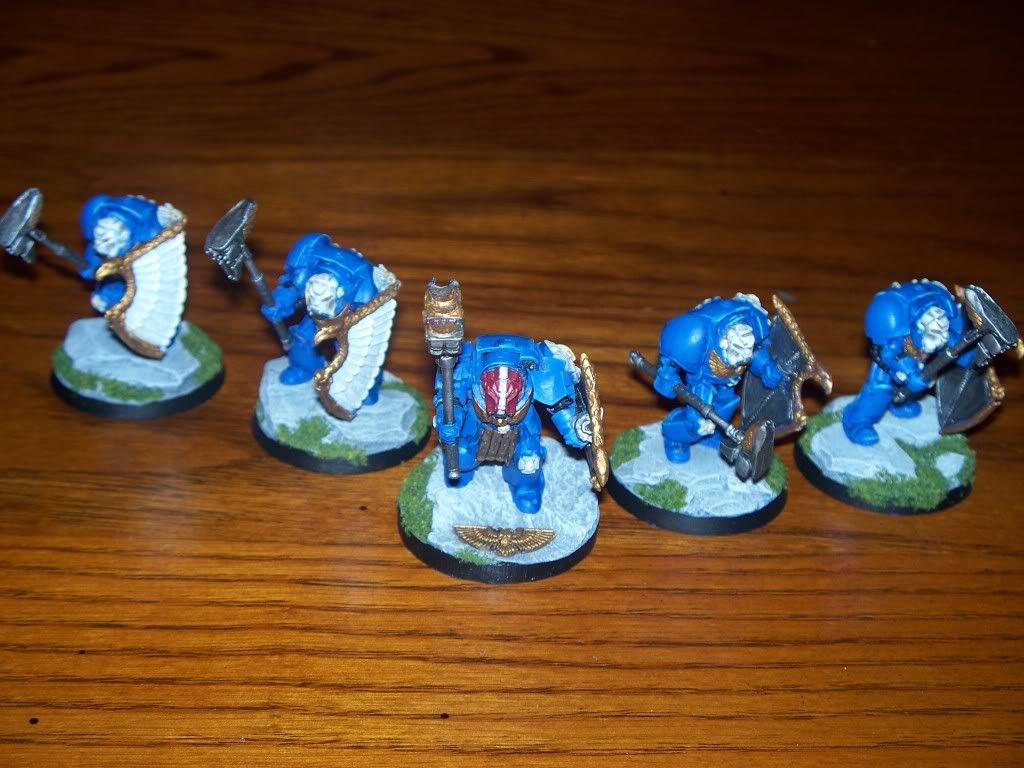
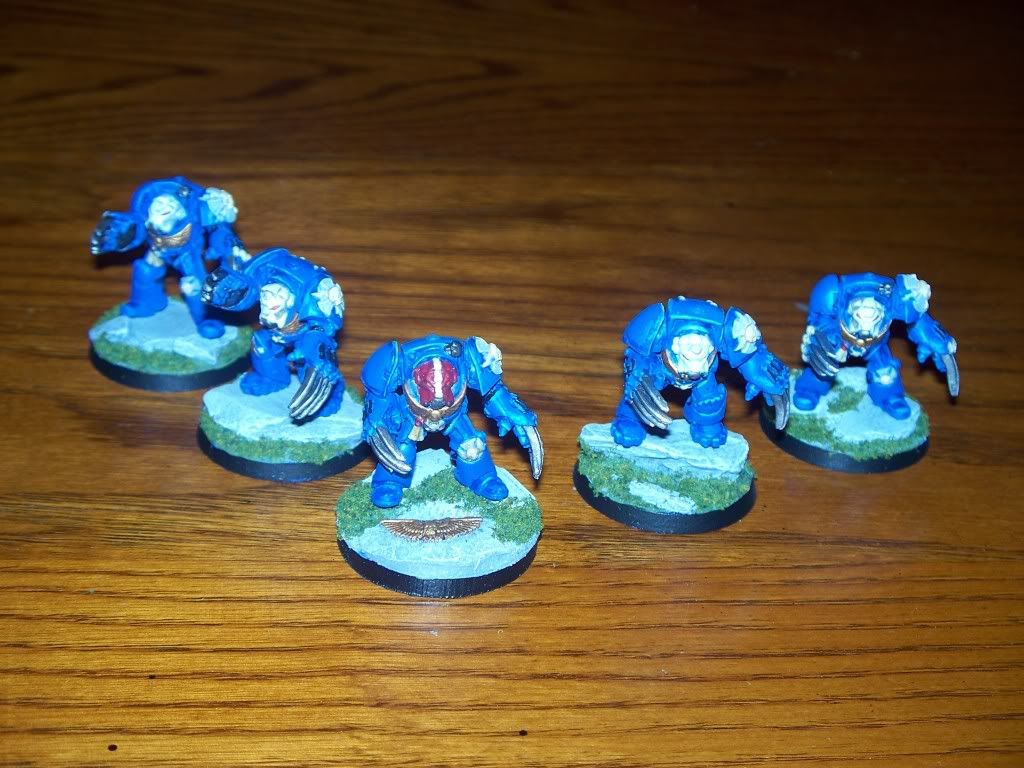
Lightning Claws (Why? Because I ran out of arms and have a ton of claws).
Lastly, Captain, Librarian, and missile:

I really like the shields and hammers and I think they work much better than the dinky shields the terminators come with. They have flourish worthy of 1st Company marines.

Lightning Claws (Why? Because I ran out of arms and have a ton of claws).

Lastly, Captain, Librarian, and missile:

Saturday, November 12, 2011
The Story So Far
Although I think this may be a ploy by my once-again nemesis to spy on what I have available for our upcoming battles(I still have some tricks up my sleeve if that is the case), here is what I have done so far for my Ultramarines project (bear in mind that this has been this year alone):
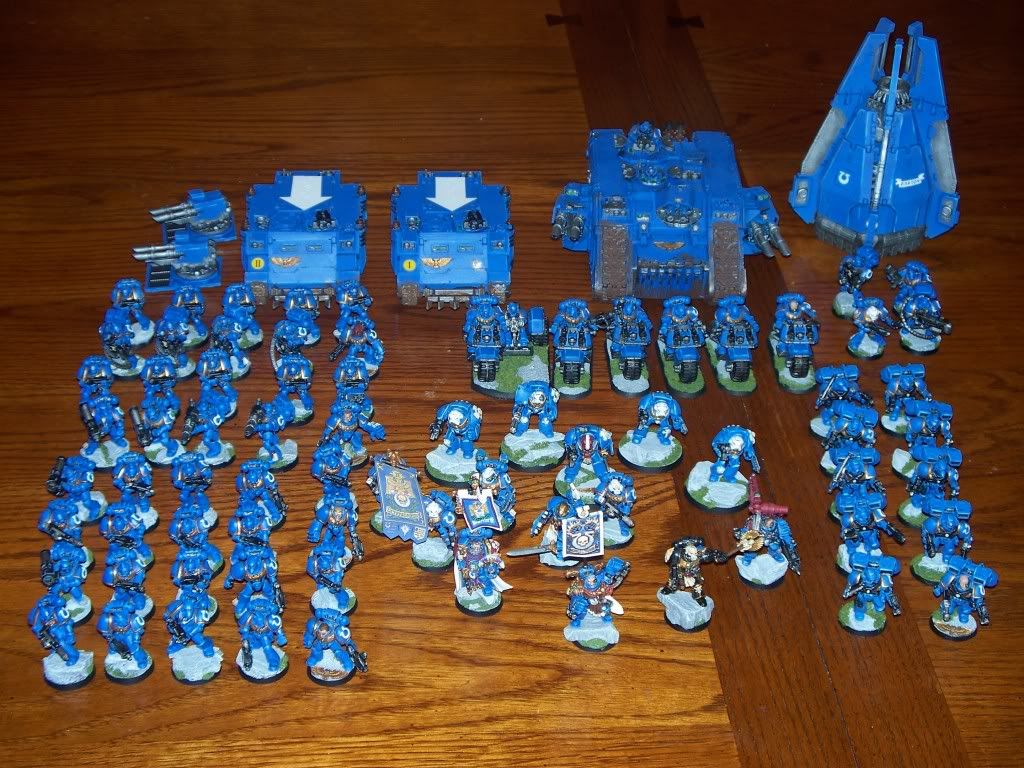
It does mean that I need to plan out carefully my next couple of moves as time is running out...

It does mean that I need to plan out carefully my next couple of moves as time is running out...
Thursday, November 10, 2011
Rhino/Razorbacks
Finishing off my transports for this month are these two Rhino/Razorbacks:
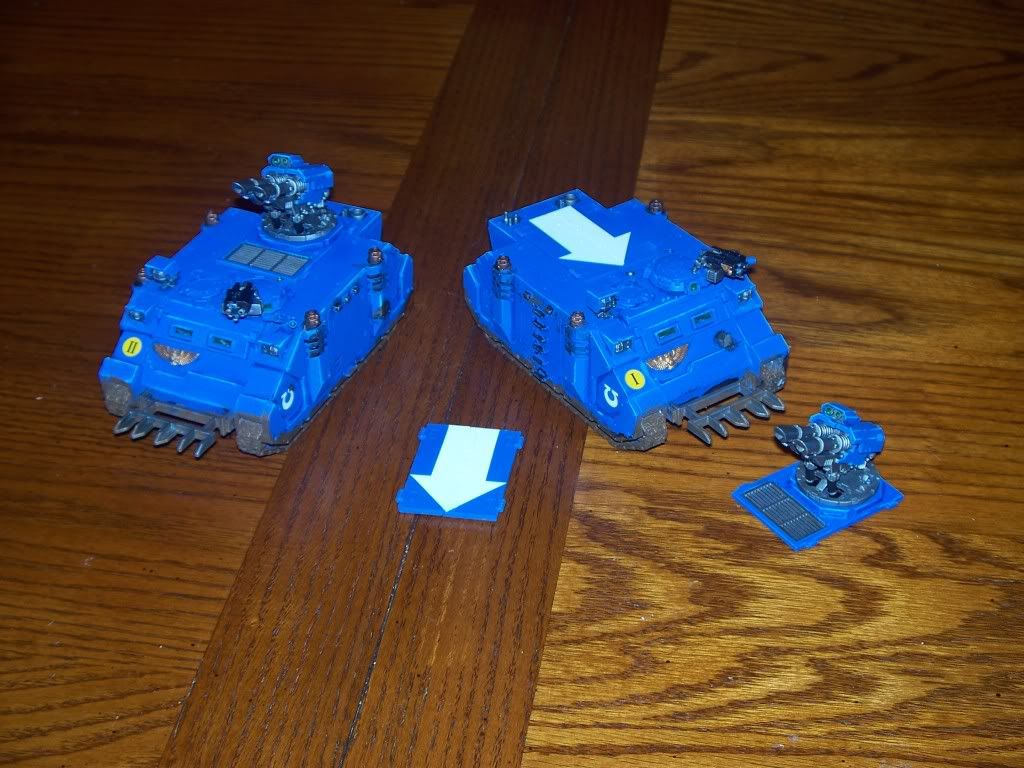
Next up will be some Thunder Hammer Terminators.

Next up will be some Thunder Hammer Terminators.
Saturday, November 5, 2011
This Old Drop Pod
This month's theme overall will be transports but for the Freebootaz November Motivational Challenge (Fast Attack-or dedicated transports for said Fast Attack) I offer This Old Drop Pod:
Bob Vila "Well let's see what Ian is doing over here."
Ian "Hi Bob, well I got this drop pod in a trade and to be frank, she needs some work."
Bob "Tell me."
Ian "Well, for starters the doors won't close and one had a peg break off. Fortuantely or unfortunately depending on your point of view, the original assembler used tons of super glue so she came apart pretty easily. I've fixed the broken door with some brass rod and shaved down more flash than paparazzi convention. The missile launcher had to be removed and remounted but it now spins again. I also stripped off the Black Templar symbols on the side. We'll see what, if anything, I replace them with."
Bob "It looks like you are making great progess. Let's go over to Sam who is working on some models he bought off of Ebay. Hey Sam, I've never seen models painted with house paint before!"
Sam "AAAAAAAAAAAAAAAAAAAHHHHHHHHHHHHHHHHHHHHHHHH!! !!"
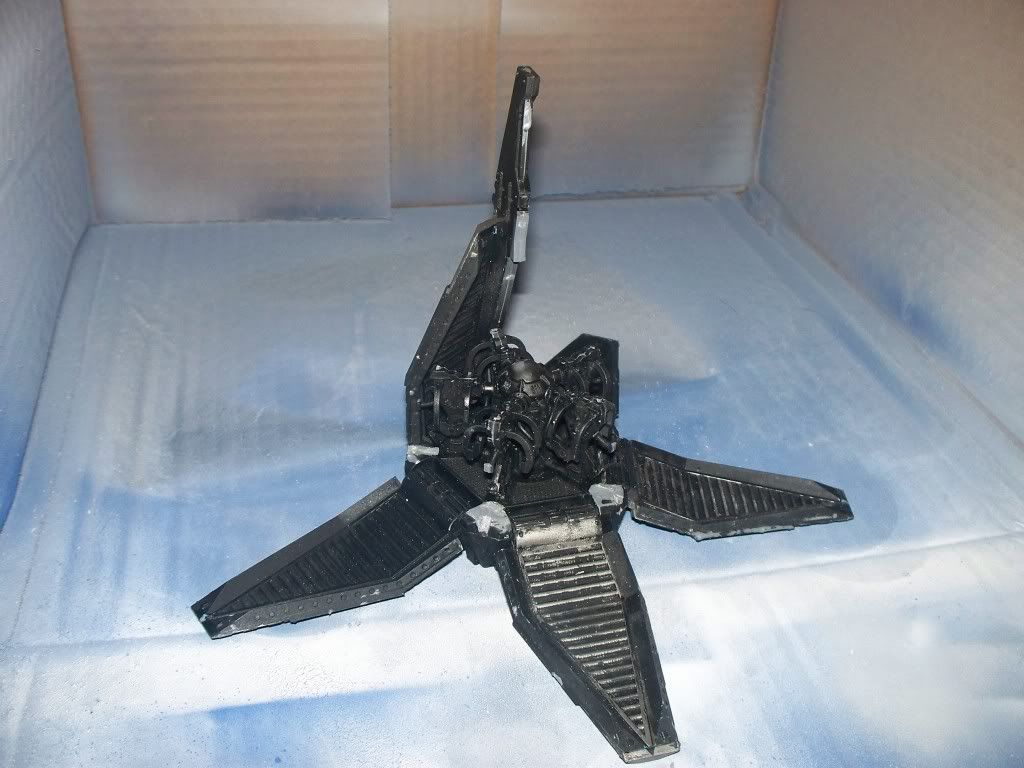
Five Days Later
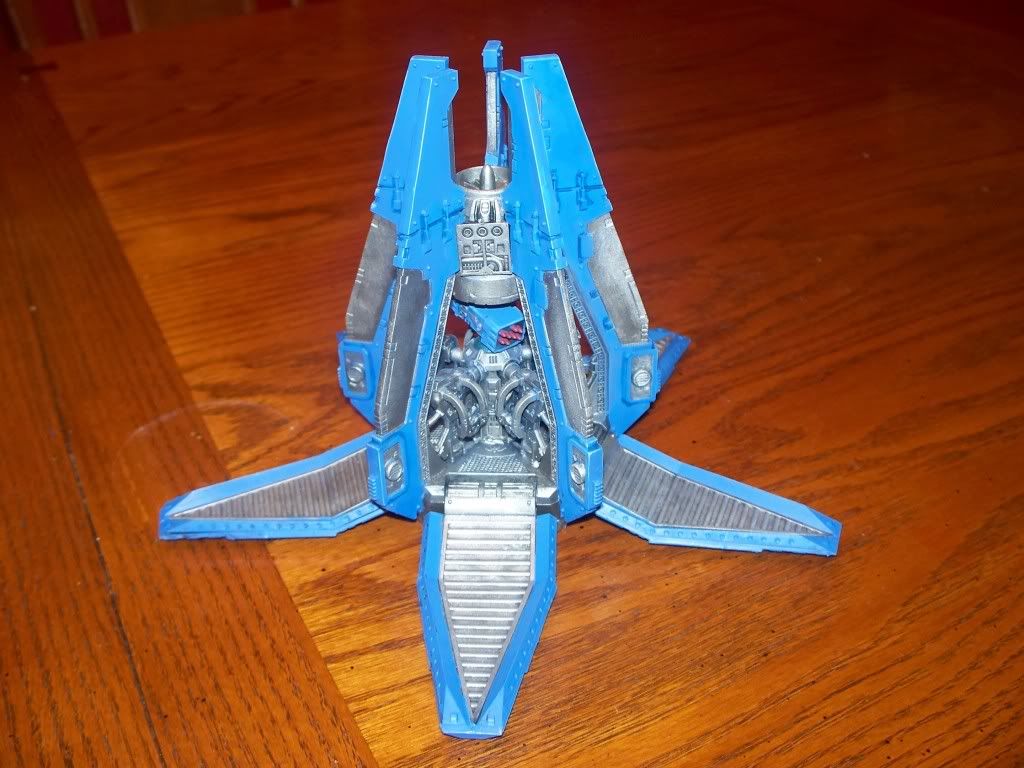
Bob "Well this really turned out well Ian."
Ian "Yeah, I had to scrape off more paint, add in some plates to cover some removed iconography and consecrate it with sacred sweet meats but overall I'm pleased with the results and you can't recognize it from the original body."
Bob "That's just great Ian. Now lets see how Sam's attempt to strip that house paint off using sulfuric acid went."
Sam "AAAAAAAAAAAAAAAARRRRRRRRRRRRRGGGGGGGGGGGGGHHHH!"
Bob Vila "Well let's see what Ian is doing over here."
Ian "Hi Bob, well I got this drop pod in a trade and to be frank, she needs some work."
Bob "Tell me."
Ian "Well, for starters the doors won't close and one had a peg break off. Fortuantely or unfortunately depending on your point of view, the original assembler used tons of super glue so she came apart pretty easily. I've fixed the broken door with some brass rod and shaved down more flash than paparazzi convention. The missile launcher had to be removed and remounted but it now spins again. I also stripped off the Black Templar symbols on the side. We'll see what, if anything, I replace them with."
Bob "It looks like you are making great progess. Let's go over to Sam who is working on some models he bought off of Ebay. Hey Sam, I've never seen models painted with house paint before!"
Sam "AAAAAAAAAAAAAAAAAAAHHHHHHHHHHHHHHHHHHHHHHHH!! !!"

Five Days Later
Bob "Well this really turned out well Ian."
Ian "Yeah, I had to scrape off more paint, add in some plates to cover some removed iconography and consecrate it with sacred sweet meats but overall I'm pleased with the results and you can't recognize it from the original body."
Bob "That's just great Ian. Now lets see how Sam's attempt to strip that house paint off using sulfuric acid went."
Sam "AAAAAAAAAAAAAAAARRRRRRRRRRRRRGGGGGGGGGGGGGHHHH!"

Subscribe to:
Posts (Atom)